You have provisioned a new Windows Server 2012 server core machine and you want to connect it to the domain. Before you do this there are 5 steps you generally want to perform:
Rename Windows Server 2012 using NETDOM
Execute the following command to rename the server using the NetDom utility.
netdom renamecomputer Server2012 /NewName FileServer
Server2012 is the current name of the server, FileServer is the new name. After the rename is complete you will need to restart with the following command:
shutdown -r -f -t 0
![]()
Upon reboot type "hostname" to identify the computer was renamed.
![]()
Configure the Network Interface
Next your going to most likely want to configure a static IP unless your intending to use DHCP to provide network configuration to your Windows Server 2012 computer.
The first step is to identify the name of the interface by executing the following netsh command.
netsh interface ip show config
Next you can set the IP address, Subnet Mask and Gateway with the following command:
netsh interface ip set address name="Ethernet" static 10.10.10.50 255.255.255.0 10.10.254.254 1
![]()
To configure a primary DNS server and secondary DNS server for your "Ethernet" network interface use the following commands:
netsh interface ip set dns name="Local Area Connection" static 10.10.10.230
netsh interface ip add dns name="Local Area Connection" 10.10.10.250 index=2
![]()
Validate the configuration with IPCONFIG /ALL
![]()
Join the Computer to the Domain
To join the Server 2012 computer to the domain execute the following command.
netdom join FileServer /domain:corporatedomain.local /userd:domain/username /passwordd:password
After the computer is joined execute the following command to reboot the server.
shutdown -r -f -t 0
For security purposes I blurred out my domain name, username and password.
![]()
Now your ready to go, your new Server 2012 system is on the domain. As an optional task you can add domain groups to the local admins group on the system using the following command.
net localgroup administrators /add DomainName\UserName
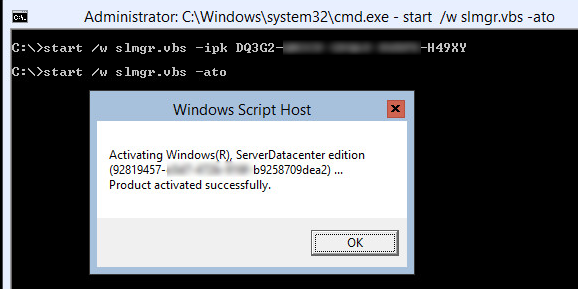
Enter Product Key and Activate
Enter the product key and activate Windows provided you do not have a Key Management Server (KMS) on your network. To enter the product key use the following command:
start /w slmgr.vbs -ipk XXXX-XXXX-XXXX-XXXX-XXXX
![]()
To Activate Windows use the following command.
start /w slmgr.vbs -ato
![]()
Install Windows Updates
To install the Windows Updates on server core we need to use a tool called sconfig.exe. Launch sconfig.exe from command line.
![]()
Select option 6 to download and install updates.
![]() Next select A to install All Updates.
Next select A to install All Updates.
![]()
Lastly select A to install all updates or alternatively select single updates to install from the list.
![]()
- Rename the computer
- Change the IP to static
- Join it to the domain
- Enter Product Key and Activate (not required if KMS is in use)
- Install Windows Updates
Rename Windows Server 2012 using NETDOM
Execute the following command to rename the server using the NetDom utility.
netdom renamecomputer Server2012 /NewName FileServer
Server2012 is the current name of the server, FileServer is the new name. After the rename is complete you will need to restart with the following command:
shutdown -r -f -t 0

Upon reboot type "hostname" to identify the computer was renamed.

Configure the Network Interface
Next your going to most likely want to configure a static IP unless your intending to use DHCP to provide network configuration to your Windows Server 2012 computer.
The first step is to identify the name of the interface by executing the following netsh command.
netsh interface ip show config
Next you can set the IP address, Subnet Mask and Gateway with the following command:
netsh interface ip set address name="Ethernet" static 10.10.10.50 255.255.255.0 10.10.254.254 1

To configure a primary DNS server and secondary DNS server for your "Ethernet" network interface use the following commands:
netsh interface ip set dns name="Local Area Connection" static 10.10.10.230
netsh interface ip add dns name="Local Area Connection" 10.10.10.250 index=2

Validate the configuration with IPCONFIG /ALL

Join the Computer to the Domain
To join the Server 2012 computer to the domain execute the following command.
netdom join FileServer /domain:corporatedomain.local /userd:domain/username /passwordd:password
After the computer is joined execute the following command to reboot the server.
shutdown -r -f -t 0
For security purposes I blurred out my domain name, username and password.

Now your ready to go, your new Server 2012 system is on the domain. As an optional task you can add domain groups to the local admins group on the system using the following command.
net localgroup administrators /add DomainName\UserName
Enter Product Key and Activate
Enter the product key and activate Windows provided you do not have a Key Management Server (KMS) on your network. To enter the product key use the following command:
start /w slmgr.vbs -ipk XXXX-XXXX-XXXX-XXXX-XXXX

To Activate Windows use the following command.
start /w slmgr.vbs -ato
Install Windows Updates
To install the Windows Updates on server core we need to use a tool called sconfig.exe. Launch sconfig.exe from command line.

Select option 6 to download and install updates.


Lastly select A to install all updates or alternatively select single updates to install from the list.