Quantcast
Channel: Clint Boessen's Blog
Viewing all 343 articles
Browse latest View live

Stellar Phoenix EDB to PST Converter Review

$
0
0
Stellar Phoenix EDB to PST Converter is an application which allows administrators to export mailboxes from an online or offline Exchange EDB database to PST format.  It is a simple and user friendly application to use and navigate which is handy for even the most inexperienced administrators.

When launching the application, Administrators are presented with two options:
  • Convert Online EDB to PST
  • Convert Offline EDB to PST

Convert Online EDB to PST Option

The convert online EDB to PST option allows administrators to connect to a live Exchange environment and export mailboxes to PST while users are working.  This option requires you to specify the connection details of your Exchange server along with credentials for a user account which has administrative access to export mailboxes.  To perform the export the credentials specified must also have access to all user mailboxes across the Exchange organisation.

The Online EDB to PST conversion option is a nice to have option due to the user friendly nature of the application however it is not something I would recommend to companies as a reason to purchase the Stellar Phoenix EDB to PST Converter application.  Microsoft has already shipped tools with all versions of Exchange to mass export user mailboxes to PST from online mailboxes.  For Example, Exchange 5.5, 2000 and 2003 has a tool named ExMerge which has the ability to export all mailboxes to separate PST files for all users in an Exchange organisation.  Exchange 2007, 2010 and 2013 has the ability to export all mailboxes to PST files using PowerShell.  Exchange Management Shell has a Export-Mailbox or New-MailboxExportRequest depending on what version of Exchange your currently running.

This being said, these tools provided by Microsoft only allow you to export entire mailboxes to PSTStellar Phoenix EDB to PST Converter allows you to select individual folders or messages from an Exchange Mailbox and export only a subset of data which is relevant to PST.  This granular selection provided by the application provides administrators with more flexibility when managing their online exports.

Convert Offline EDB to PST Option

Convert Offline EDB to PST option allows administrators to extract PST files from an EDB file without the presence of an Exchange server.  This is very handy for companies who want to restore select emails from an offline EDB backup file without restoring the entire EDB file back into an Exchange environment such as a Recovery Storage Group (RSG).

When you choose to select Offline EDB to PST conversion, the tool will ask you to specify a path to the EDB file along with specifying what version of Exchange the EDB file was created in.


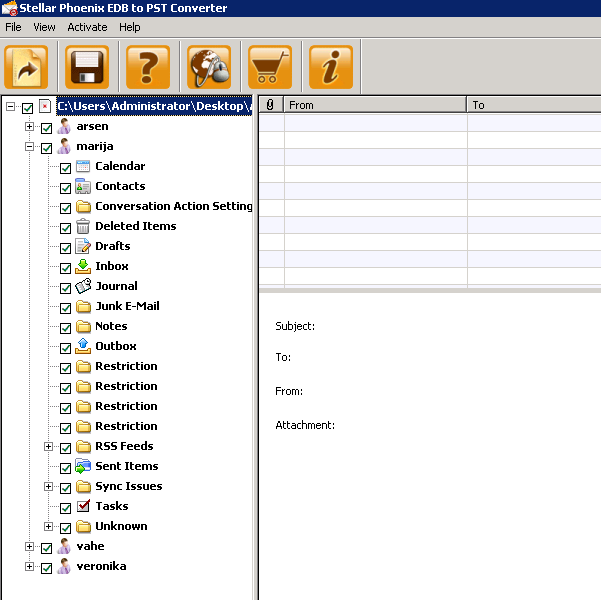
After selecting the EDB file the application will break down all mailboxes available for export.  As an administrator you can select which mailboxes you wish to export to PST including granular selection of which folders/items you wish to export from each mailbox.


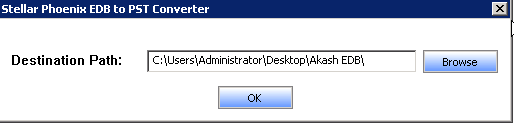
After the selection process is completed, click the save button which is represented by an old fashion floppy disk.  Specify a folder which you would like to export all PST files to.


The tool will then go through and begin the process of exporting all mailboxes selected to individual PST files.  The PST files will be created in the format of "mailboxname.pst"


Exchange 2013 Support

At the time of writing this review,  Stellar Phoenix EDB to PST Converter does not currently support Microsoft Exchange Server 2013 or 2013 SP1 mailbox database files.  Stellar Phoenix said this is currently being worked on and support for this will be added to the product in the next couple of months.

Licensing and Pricing

Stellar Phoenix EDB to PST Converter has two licensing options, "Administrator License" and "Technician License".

The Administrator License allows for the product to be installed on unlimited workstations within a single site (or physical office).

The Technician License allows for the product to be installed on unlimited workstations across all physical offices throughout an organisation.

It is important to note that in both licenses, only a single conversion can be performed simultaneously.

The Administrator License is priced at $399 USD while the Technician License  is priced at $499 USD.  These prices are correct as of this writing but are subject to change.  For the latest pricing on Stellar Phoenix EDB to PST Converter, please refer to the following web page:

http://www.stellarinfo.com/email-repair/edb-pst-converter/buy-now.php

Backup Exec 2010 and Exchange 2010 Recovery Problems

$
0
0
Yesterday I responded to an emergency callout to a customer with 800 users running a single Exchange 2010 SP3 UR3 multi role server running on Windows Server 2008 R2 SP1.  The server server would not boot and was simply blue screening.  We were not able to access Windows in anyway even by booting into safe mode and had no indication as to why the failure occurred as we could not access the server event logs.  The Exchange 2010 SP3 server was running on top of a VMware vSphere 5.1 clustered environment hosted on shared storage.

This server was one I setup a couple of years back and as a result it followed my standard multi-role Exchange server build which consists of two or more NTFS volumes.
  • Volume 1 (SYSTEM) consists of Operating System, Page File and Exchange System Files.
  • Volume 2 (Logs  + Database) which contain the Exchange 2010 database and log files
Due to the changes in Disk I/O it is no longer a requirement to separate transaction logs from the Exchange database as I/O is no longer an issue.  Remember Exchange 2010 has a 90% disk I/O reduction over Exchange 2003.

Note: This server only had two volumes however additional volumes can exist in the event additional databases are required.

As the system volume was corrupt and no longer booting, this needed to either rebuilt or restored from backup.  The database/log volume was assumed to be fine and the plan was to simply re-attach the database/log files after the system volume containing Windows and Exchange server was restored.  We did have a full backup of the Exchange 2010 server through Backup Exec 2010 R3 SP3 which was taken on the weekend of both the system volume and system state.  As a result we had two methods for recovering this Exchange 2010 SP3 server bringing it back online:
  • Recover the servers system volume and system state using the last backup taken with Backup Exec and relink it to the database/log volume.
  • Recover the Server by performing an Exchange Recover Server installation to reconnect a newly installed Exchange server to the existing configuration stored in the Active Directory configuration partition using the Setup /m:RecoverServer switch.
It was deemed at the time, the best course of action would be to recover the server through Backup Exec as this would ensure things such as the digital certificate and Exchange Web service URL addresses would all be restored back to their original state.

Backup Exec 2010 R3 SP3 Issues

I have been working with Backup Exec for over 8 years now back when it was owned by a company named Veritas.  Every time I have had to perform a full system restore of a failed server, it has always been a cumbersome process aligned with multiple challenges.  After the so many years of having this product on the market, you think the functionality of the "Backup" and "Restore" processes would be completely ironed out and bullet proof, after the primary purpose of this product is to backup and restore data.  However, this my friends is what makes Backup Exec "special", the ability to cause companies pain by not performing these tasks.

Despite having used Backup Exec to recover servers in the past, from the history experienced with the product, to give myself the best chance for a successful restore I put what I knew aside and followed the Symantec online documentation exactly.  To restore a server running Windows Server 2008 or Windows Server 2008 R2, Symantec has published a knowledge base article on their support page to restore a remote Windows 2008 computer which has completely failed.  This is the most important support page article they could publish online as it documents the steps to restore a failed Windows Server, again the whole point of a backup and restore program.  As a result you think the instructions documented on this particular article would be 100% accurate and reviewed carefully by the Symantec support team.  Unfortunately, this is not the case and the below article does have technical mistakes to performing a successful restore of a Windows 2008 server.

http://www.symantec.com/business/support/index?page=content&id=TECH86323

In the instructions taken from the above article entitled "Disaster Recovery restore steps for a remote Windows 2008 computer" it states to:
  • Build a new Windows Server 2008 computer by performing a fresh install
  • Provide it the same computer name as before
  • Ensure it has the same disk configuration as the previous system
  • Do not join the new computer to an Active Directory domain, instead leave it as Workgroup.

Following these instructions exactly, I was unable to proceed with the restore documented further down in step 10 in the documentation.  At this point we raised a support case with Symantec Gold Support to assist us with restoring the server.  The Symantec support engineer after taking the case advised us that the instructions documented online were incorrect and the server needed to be joined to the domain.

After joining the computer to the domain I was able to proceed with performing the restore task.  The task proceeded successfully until it got to 91% where the following error was generated.

V-79-57344-782
The job failed with the following error: Unable to swap out active registry hive with new data

 
After rebooting the server being restored, Windows Boot Manager was unable to boot the server as it was left in a corrupt state.
 
 
At this point the Symantec engineer asked us to retry the process.  It failed again, exact same experience.  At this point the company had been without email for over 12 hours due to the lengthy timeframe Backup Exec takes to restore data.

Symantec then ran a tool on the Backup Exec media server to collect a bunch of logs for analysis and advised us that they require 48 hours to review why the server restore is failing.  When we asked them the question "so you expect us to be without email for 48 hours", their response was yes there is nothing we can do.

Exchange 2010 Recover Server Installation

At this point I advised my customer that we need to forget about Backup Exec and proceed doing a native Exchange 2010 Recover Server installation using the Setup /m:RecoverServer, something I had faith in working.  We rebuilt the Windows 2008 R2 server, provided it the same host name, re-joined it to the domain, installed all windows updates along with Exchange 2010 pre-requisites.

One thing I noticed is the Exchange 2010 SP3 media does not allow you to run Setup /m:RecoverServer, it errors out.  You must run the Recover Server installation from Exchange 2010 SP2 media and then after the install proceed to installing Exchange 2010 SP3 followed by the latest update rollup.

We had the server up within 2 hours of starting this procedure.

Summary

I have had many customers including a few government departments of recent turning their backs on Symantec and moving to backup products focusing on virtualisation such as Veeam.  This is due to a number of issues with Backup Exec including lengthy backup times, problematic issues with administrators for ever fixing backup errors and issues restoring.  This is yet another customer of mine who will be moving away from Symantec Backup Exec.

OWA Search - The action couldn't be completed. Please try again.

$
0
0
I came across a weird problem today when searching for emails in Outlook Web App, the following error was returned:

The action couldn't be completed.  Please try again.


In the server event logs, the MSExchangeIS Mailbox Store service generated Event ID 9842

Log Name:      Application
Source:        MSExchangeIS Mailbox Store
Date:          4/03/2014 6:14:39 PM
Event ID:      9842
Task Category: Content Indexing
Level:         Error
Keywords:      Classic
User:          N/A
Computer:      Server01.at.local
Description:
Function CISearch::EcGetRowsetAndAccessor detected that content indexing was disabled for database 'Mailbox Database 0742665828' because of error '0x80041820' from MSSearch.


I looked into this issue online, and saw two blog posts which both indicate to run setup /PrepareAD again on the Exchange server:
I do not understand what the point of this.  Once an Active Directory class object or attribute has been created, it is impossible to delete it.  As of 2003 Forest Functional Level (FFL), Microsoft put the ability in place to disable attributes/class objects.  However you cannot delete objects.  As setup /PrepareAD is run when installing Exchange or applying a service pack, it never needs to be run again.

In my environment I restarted the following services in this order:
  1. Microsoft Exchange Search Indexer
  2. Microsoft Search (Exchange)
  3. Microsoft Exchange Information Store
After restarting the services in this order, testing Outlook Web App I was able to search for content again.  No need to run the setup /PrepareAD command!

What is DNS Devolution?

$
0
0
I came across this new buzz word when studying to upgrade my MCITP: EA to MCSE: Server Infrastructure.  This is a terminology I have never come across before and was not in my MCITP: EA.

Devolution is a method which allows member computers that are part of a child domain to resolve hostnames in parent domains.  Devolution creates new FQDNs by appending a single name queried like "Clints-PC" with parent suffixes for domains above it.

For example Clints-PC is in a child domain called "australia.corp.avantgardetechnologies.com.au" where avantgardetechnologies.com.au is the root domain with two child domains.  I have painted this in the following diagram.
 

If Clints-PC goes and pings "Avantgarde-FS01" the following will happen:

Clints-PC will query Avantgarde-FS01
Clints-PC will then query Avantgarde-FS01.australia.corp.avantgardetechnologies.com.au
Clints-PC will then query Avantgarde-FS01.corp.avantgardetechnologies.com.au
Clints-PC will then query Avantgarde-FS01.avantgardetechnologies.com.au

That is DNS Devolution my friends in a nutshell, it provides member computers the ability to search up the tree using different FQDN's until it can resolve one.

Also of importance, you can configure computers with a devolution value which is represented by a number.  This tells computers how far up the tree they can query before devolution will terminate.  The ability to control how far up the tree termination occurs is a new feature introduced in the Windows 7 / 2008 R2 operating systems.  For more information on this I recommend having a read of the following article http://technet.microsoft.com/en-us/library/ee683928.aspx

Now there are a few things you must also know about DNS Devolution.  Many companies that run multiple domains generally configure a "Global Suffix Search List" with Group Policy.  This specifies an order of domain names a single name resolution attempt will try and qualify itself against.  For example, lets say I have a global suffix search list as follows configured on the australia.corp.avantgardetechnologies.com.au domain pushed out with Group Policy:
  1. australia.corp.avantgardetechnologies.com.au
  2. sales.avantgardetechnologies.com.au
  3. avantgardetechnologies.com.au
With this configured, Clints-PC will now attempt to resolve the Avantgarde-FS01 in the order above and no longer work its way up the tree.  As soon as you configure a global suffix search list, DNS Devolution automatically gets disabled.

The second important thing you need to know about DNS Devolution is you must have "Append parent suffixes of the primary DNS suffix" check box selected under the Advanced TCP/IP settings for IPv4/IPv6.

That's it in a nutshell guys!  Thanks for reading.

Active Sync Device Reports

$
0
0
This post is just a quick reference to Active Sync report scripts which are available for Exchange 2007 and Exchange 2010/2013.  Exchange 2007 is a little different to pull reports as the Get-ActiveSyncDevice cmdlet does not exist, only the Get-ActiveSyncDeviceStatistics command exists on Exchange 2007.

On Exchange 2007, to quickly pull a CSV of ActiveSync activity including EmailAddress, DeviceType and LastSuccessSync, simply execute the following PowerShell command in an Exchange 2007 Exchange Management Shell:

Get-Mailbox -ResultSize:Unlimited | ForEach {Get-ActiveSyncDeviceStatistics -Mailbox:$_.Identity} | Where {$_.LastSuccessSync -gt '2/15/2012'} | Sort-Object -Property DeviceType,Identity | Select-Object @{name="EmailAddress";expression={$_.Identity.ToString().Split("\")[0]}},DeviceType,LastSuccessSync | Export-Csv -Path:"C:\MobileDevices.csv"

This code snippet was slightly modified from the one documented by Nick Smith on his following blog post: http://knicksmith.blogspot.com.au/2007/03/dst-and-mobile-devices.html

For Exchange 2010, you can't get much better then the PowerShell script Get-ActiveSyncReport.ps1 created by Paul A. Ponzeka and Paul Cunningham.  This script will generate you a CSV file and email you a formatted email with CSS styles created by Paul Cunningham which looks similar to the following screenshot:


To obtain a copy of the script, latest versions and additional information please refer to the following website:

http://port25guy.com/2013/03/25/how-to-get-a-report-of-active-sync-devices-in-exchange-2010exchange-2013/

It is important to note, that I will not be maintaining an updated copy of this script so please refer to the authors official website.  Encase something happens to this page in the future, to ensure this script remains available I have posted a copy of the code below.

### BEGINNING OF SCRIPT #####
#
# Get-ActiveSyncDeviceReport
# Author: Paul Ponzeka
# Website: port25guy.com
# email ponzekap2 at gmail dot com
#
######
param(
    [Parameter(Mandatory = $true)]
    [string] $SMTPServer = “”,
    [Parameter(Mandatory = $true)]
    [string] $SMTPFrom = “”,
    [Parameter(Mandatory = $true)]
    [string] $SMTPTo = “”,
    [Parameter(Mandatory = $true)]
    [string] $exportpath = “”
    )
 $SMTPServer = "ExchangeFQDN.domain.local"
$SMTPFrom = "
mrscript@domain.local"
$SMTPTo = "
mradministrator@domain.local"
$exportpath = "c:\"
#######
#
# HTML Formatting Section
# Thanks to Paul Cunningham at
http://exchangeserverpro.com/
#
#######
#
#
#
######
$style = “
$messageSubject = “ActiveSync Device Report” $message = New-Object System.Net.Mail.MailMessage $smtpfrom, $smtpto
$message.Subject = $messageSubject
$message.IsBodyHTML = $true
####  Get Mailbox $EASDevices = “”
$AllEASDevices = @()
$EASDevices = “”| select ‘User’,'PrimarySMTPAddress’,'DeviceType’,'DeviceModel’,'DeviceOS’, ‘LastSyncAttemptTime’,'LastSuccessSync’
$EasMailboxes = Get-Mailbox -ResultSize unlimited
foreach ($EASUser in $EasMailboxes) {
$EASDevices.user = $EASUser.displayname
$EASDevices.PrimarySMTPAddress = $EASUser.PrimarySMTPAddress.tostring()
    foreach ($EASUserDevices in Get-ActiveSyncDevice -Mailbox $EasUser.alias) {
    $EASDeviceStatistics = $EASUserDevices | Get-ActiveSyncDeviceStatistics
    $EASDevices.devicetype = $EASUserDevices.devicetype
    $EASDevices.devicemodel = $EASUserDevices.devicemodel
    $EASDevices.deviceos = $EASUserDevices.deviceos
    $EASDevices.lastsyncattempttime = $EASDeviceStatistics.lastsyncattempttime
    $EASDevices.lastsuccesssync = $EASDeviceStatistics.lastsuccesssync
    $AllEASDevices += $EASDevices | select user,primarysmtpaddress,devicetype,devicemodel,deviceos,lastsyncattempttime,lastsuccesssync
    }
    }
$AllEASDevices = $AllEASDevices | sort user
$AllEASDevices
$AllEASDevices | Export-Csv $exportpath\ActiveSyncReport.csv
######
#
# Send Email Report
#
########
$message.Body = $AllEasDevices | ConvertTo-Html -Head $style $smtp = New-Object Net.Mail.SmtpClient($smtpServer)
$smtp.Send($message)
##END OF SCRIPT 


Important

 Make sure you fill out this section of the script:

$SMTPServer = "ExchangeFQDN.domain.local"
$SMTPFrom = "mrscript@domain.local"
$SMTPTo = "mradministrator@domain.local"
$exportpath = "c:\"
 

Find who is logged onto a remote workstation

$
0
0
As a system administrator you often need an easy way to remotely identify what user is logged into a workstation.  But how do you do this?

Simple, run the following command:

qwinsta /server:hostname


 This command will identify any console sessions and terminal sessions established to the remote computer.

QWINSTA comes with part of Windows Server/Client operating system, no third party tools are required.

Exchange 2010 SP1 Recover Server Installation Problems

$
0
0
A customer of mine attempted to upgrade their Exchange 2010 SP1 server to Exchange 2010 SP2 however the installation failed and the customer was unable to install the Exchange 2010 SP2 language packs.  The customer then attempted to restore the server from backup however found their Exchange 2010 server was not currently being backed up by Veeam. "Doh".

This server was setup with two partitions:
  • Volume 1 (SYSTEM) consists of Operating System, Page File and Exchange System Files.
  • Volume 2 (Logs  + Database) which contain the Exchange 2010 database and log files
The database and log files were fine, only the system drive needed to be restored.  The customer proceeded to perform a recovery installation of Exchange server using the procedure documented on TechNet under the following article:

http://technet.microsoft.com/en-us/library/dd876880(v=exchg.141).aspx

When following the instructions on the TechNet article, the customer by mistake accidently deleted the Exchange 2010 server computer object from Active Directory instead of resetting the computer account in Active Directory as documented.  The customer had been working all night however trying to recover the server and was fatigued and exhausted - I also make mistakes when working on a problem for that long, not good!

When performing the server Exchange 2010 Recover Server installation by running setup /m:RecoverServer the following error was experienced when the Hub Transport installation got to 98%.


The Exchange 2010 SetupLogs contained the following:

[03/14/2014 03:04:49.0244] [2] Ending processing configure-WSManIISHosting
[03/14/2014 03:04:49.0244] [1] Processing component 'Active Directory Topology Service Configuration' (Configuring Microsoft Exchange Active Directory Topology service).
[03/14/2014 03:04:49.0244] [1] Executing:
          if ($exsSid -eq $null -or $exsSid -eq "")
          {
          $exsSid = get-ExchangeServerGroupSID -DomainController $RoleDomainController
          }
          start-setupservice -ServiceName MSExchangeADTopology -ServiceParameters $exsSid,$RoleDomainController
       
[03/14/2014 03:04:49.0244] [2] Active Directory session settings for 'get-ExchangeServerGroupSid' are: View Entire Forest: 'True', Configuration Domain Controller: 'AB-DC-01.domain.local', Preferred Global Catalog: 'AB-DC-01.domain.local', Preferred Domain Controllers: '{ AB-DC-01.domain.local }'
[03/14/2014 03:04:49.0244] [2] Beginning processing get-ExchangeServerGroupSID -DomainController:'AB-DC-01.domain.local'
[03/14/2014 03:04:49.0260] [2] Used domain controller AB-DC-01.domain.local to read object DC=domain,DC=local.
[03/14/2014 03:04:49.0260] [2] Used domain controller AB-DC-01.domain.local to read object CN=Exchange Servers,OU=Microsoft Exchange Security Groups,DC=domain,DC=local.
[03/14/2014 03:04:49.0260] [2] Used domain controller AB-DC-01.domain.local to read object CN=Exchange Servers,OU=Microsoft Exchange Security Groups,DC=domain,DC=local.
[03/14/2014 03:04:49.0260] [2] Ending processing get-ExchangeServerGroupSID
[03/14/2014 03:04:49.0260] [2] Active Directory session settings for 'start-SetupService' are: View Entire Forest: 'True', Configuration Domain Controller: 'AB-DC-01.domain.local', Preferred Global Catalog: 'AB-DC-01.domain.local', Preferred Domain Controllers: '{ AB-DC-01.domain.local }'
[03/14/2014 03:04:49.0260] [2] Beginning processing start-setupservice -ServiceName:'MSExchangeADTopology' -ServiceParameters:'S-1-5-21-304512598-190217263-239210854-13503','AB-DC-01.domain.local'
[03/14/2014 03:04:49.0275] [2] Service checkpoint has progressed. Previous checkpoint='0' - Current checkpoint='1'.
[03/14/2014 03:04:49.0275] [2] Will wait '30000' milliseconds for the service 'MSExchangeADTopology' to reach status 'Running'.
[03/14/2014 03:05:19.0291] [2] Service 'MSExchangeADTopology' failed to reach status 'Running' on this server after waiting for '30000' milliseconds.
[03/14/2014 03:05:19.0291] [2] Service checkpoint has progressed. Previous checkpoint='1' - Current checkpoint='2'.
[03/14/2014 03:05:19.0291] [2] Will wait '1250000' milliseconds for the service 'MSExchangeADTopology' to reach status 'Running'.


From the error the MSExchangeADTopology was failing to start in a timely fashion.  I have had numerous problems with Exchange 2010 having difficulty communicating with Active Directory or randomly loosing communication to Active Directory in the past at various customers despite the windows server being able to authenticate against a domain controller.  I have wrote about these problems a previous blog post:

http://clintboessen.blogspot.com.au/2012/09/exchange-2010-randomly-loosing-access.html

As a result, the following changes were put in place to ensure Exchange does not experience difficulties with AD communication:

netsh int tcp set global chimney=disabled
netsh int tcp set global rss=disabled

 
In addition to this, numerous issues can be caused by IPv6 on an Exchange 2010 server.  Again I have documented some of these which I have experienced in the past on my blog if you search for IPv6 Exchange you will find them.  As a result IPv6 was disabled on the network interface card in Control Panel and by putting the following registry key in place.
 
HKEY_LOCAL_MACHINE\SYSTEM\CurrentControlSet\Services\Tcpip6\Parameters\
 
Create a new DWORD 32bit value called DisabledComponents.
 
This is following the procedure documented here: http://support.microsoft.com/kb/929852

Note: It is important to note, never disable IPv6 on a network interface without putting the DisabledComponents registry key in place or it can cause problems, not just for Exchange!
 
After these changes the setup was re-run, but failed again due to the water marks of the previous Exchange Setup still existing in the registry.  This is completely normal in the event an Exchange server installation ever fails.  To remove the water marks, simply navigate to the following registry key:
 
HKEY_LOCAL_MACHINE\SOFTWARE\Microsoft\ExchangeServer\v14\HubTransportRole and delete the both the Action and Watermark registry keys.
 
 
Note: If another server role fails to install, replace v14\HubTransportRole with the role that failed.  In my case it was Hub Transport!
 
Re-ran the setup again, failed yet again!  After further investigation this was found to be related to the fact my customer had deleted the computer account object prior to doing the RecoverServer installation.  As a result the Exchange Server was no longer a member of the correct groups in Active Directory.
 
I re-added the Exchange Server computer object which was being restored to the "Exchange Servers" group and the "Exchange Install Domain Servers" group.  After re-adding the server to these security groups, I was able to successfully complete the Exchange 2010 SP1 Recover Server installation. 
 
Please note, in relation to the customer deleting the computer object prior to performing the Recovery Installation, I also experienced the following problem after successfully completing the recover server installation:
 

Active Directory operation failed on DomainController.domain.local. This error was not retriable.

$
0
0
I had just finished a "Recover Server" installation for a customer of mine who has major issues on their Exchange server and had to rebuild the system drive.  This issue was documented on the following blog post, please read as this issue is related:

http://clintboessen.blogspot.com.au/2014/03/exchange-2010-sp1-recover-server.html

After performing the Recover Server installation, I reinstalled the Digital Certificate with private key and went to begin reconfiguring the web URLs.  When attempting to configure the WebServicesVirtualDirectory, ActiveSyncVirtualDirectory, OWAVirtualDirectory or any of the other virtual directories, I was presented with the following error.

Active Directory operation failed on DomainController.domain.local.  This error was not retriable.  Additional information: Insufficient access rights to perform the operation.


After a long time diagnosing it was found the issue was because the Exchange server object was not in the "Trusted Exchange Subsystem" security group.  This security group is "CRITICAL" to Exchange 2010, and I was surprised the server was able to load and even serve user Outlook requests!
 
The server was not in this group as the customer had deleted the computer object prior to commencing the Exchange server recovery installation as mentioned in the blog post list documented above.
 
After re-adding the server to the Trusted Exchange Subsystem and rebooting, I was able to configure the URL's successfully.


Renaming Exchange 2013 Server Name

$
0
0
Is it possible to rename an Exchange 2013 server by changing the hostname?

The answer is No, it is not supported.

The hostname of an Exchange 2013 server must never be changed!  If you need to change the name of the server, simply build a new Exchange 2013 server and migrate.

Exchange TechNet Documentation Warning

$
0
0
With the release of Exchange 2013, back in 2012 Microsoft made a change to all online TechNet documentation where links which use to refer to Exchange 2010 documentation now refers to the Exchange 2013 documentation.  This has frustrated the IT community as this means all links on blogs, online publications and books are now invalid.

For example, a publication may have a link referencing to what was at the time an Exchange 2010 TechNet document, however when the user goes to the link now, the article is now the Exchange 2013 pointing the user at misleading documentation due to subtle differences between product releases.

To illustrate this change, lets take an article such as "Recover an Exchange Server", the TechNet document which provides companies the procedure for performing an Exchange Recover Server installation.  This article is available at the following URL:

http://technet.microsoft.com/en-us/library/dd876880.aspx

TechNet article dd876880 use to refer to Exchange 2010, however if you go to it now it provides documentation for Exchange 2013.

Another example is the most important article Exchange Prerequisites which provides all the prerequisites required for performing an Exchange Server installation.  TechNet article bb691354 use to reference Exchange 2010 but now it points to the Exchange 2013 article.

http://technet.microsoft.com/en-us/library/bb691354.aspx

How do I get the previous product version articles?

Since these changes it has been very difficult to pull up previous versions of Exchange documentation as searches in Google/Bing even if you specify "Exchange 2010" or "Exchange 2007" still always come up with the Exchange 2013 documentation.  There is however an easier way to get to previous documentation which I will show you below.

For Exchange 2013 documentation specify (v=exchg.150) in the TechNet URL link.
For Exchange 2010 documentation specify (v=exchg.141) in the TechNet URL link.
For Exchange 2007 documentation specify (v=exchg.80) in the TechNet URL link.

For the "Recover an Exchange Server" documentation, to access the Exchange 2010 documentation the link would look like:

http://technet.microsoft.com/en-us/library/dd876880(v=exchg.141).aspx

To access the Exchange 2013 document for the same article, the link would look like:

 http://technet.microsoft.com/en-us/library/dd876880(v=exchg.150).aspx

For this particular article, there is no Exchange 2007 version so if you try with Exchange 2007 it will automatically revert to Exchange 2013.  On that note, if you enter an invalid version number, or if the article does not exist for the version you specify it will automatically redirect to the Exchange 2013 version (the latest version of Exchange).

The last thing to note, the Exchange 2007 online documentation most articles are a complete different TechNet article code (such as dd876880) and rarely does adding (v=exchg.80) to a 2010, 2013 article work.  I have found it is mainly toggling between Exchange 2010/2013 documentation works the best and is most useful.

I hope this post has been informative.

How OAB Distribution Works in Exchange 2013

$
0
0
Back in May 2009 I wrote an article entitled "How OAB Distribution Works" which covered in detail how OAB distribution works in Exchange 2007/2010.  Over the past years this article has received great feedback and has been referenced in multiple online articles, blogs and forum posts.  The article can be found under the following URL:

http://clintboessen.blogspot.com.au/2009/05/how-oab-distribution-works.html

In Exchange 2013, OAB Distribution has changed significantly removing a single point of failure to OAB Distribution and minimising the performance impact OAB Distribution has on an Exchange Server.  In this article we will be covering the new OAB Distribution in Exchange 2013

Exchange 2013 OAB Distribution

The Offline Address Book is an offline copy of the address lists within Exchange for Outlook clients running in cached Exchange mode.  The Offline Address Book is important within Exchange environments as not only does it allow Outlook clients to see the address lists when offline but also it significantly reduces the amount of address book lookups decreasing Exchange server work load.

In Exchange 2013 there are 3 components which make the OAB Distribution work:

  • OABGeneratorAssistant
  • OAB Virtual Directory
  • Autodiscover
The OAB Virtual Directory and Autodiscover components work similar as they did in Exchange 2007/2010 however the OABGen process in Exchange 2013 has been completely rebuilt into the new OABGeneratorAssistant component.

OABGeneratorAssistant

In Exchange 2007/2010 the OABGen was located under C:\Program Files\Microsoft\Exchange Server\V--\Bin\OabGen.dll.  This dynamic link library was invoked by the Exchange System Attendant service according to the OABGen schedule configured.  The primary problem with OABGen in Exchange 2007/2010 was each offline address book was bound to one mailbox server responsible for generating the OAB, a single point of failure.

The new OABGeneratorAssistant process in Exchange 2013 no longer uses the OabGen.dll dynamic link library, in fact this file has been completely removed.  The OABGeneratorAssistant is actually a mailbox assistant which runs as part of the Microsoft Exchange Mailbox Assistants service.  As with other mailbox assistances, the Microsoft Exchange Mailbox Assistants service will throttle the OABGeneratorAssistant process to ensure it does not utilise 100% of the server CPU and run at times when the server has least work load.

To get around the OABGen single point of failure which existed in Exchange 2007/2010, Microsoft now leverage Database Availability Groups (DAGs) in Exchange 2013 for OAB Generation.  Instead of generating the OAB to a folder on a mailbox server and copying the OAB to every client access server for distribution, the OAB is now stored inside an Arbitration mailbox which has been enabled for OABGen.  By default, the only Arbitration mailbox which is configured to hold the OAB is the default System Mailbox with the following GUID:

SystemMailbox{bb558c35-97f1-4cb9-8ff7-d53741dc928c}


By leveraging Database Availability Groups (DAGs), whichever server holds the database containing the default Arbitration mailbox (configured with the OrganizationCapabilityOABGen capability), will be responsible for generating the offline address books.  This server can change depending on which mailbox server is holding the Active copy of the mailbox database containing the OrganizationCapabilityOABGen Arbitration Mailbox.

When the OABGeneratorAssistant runs it performs the following core tasks:

  • Generates the OAB files to the OrganizationCapabilityOABGen Arbitration Mailbox
  • Copies the files from the OrganizationCapabilityOABGen Arbitration Mailbox to %ExchangeInstallPath%\ClientAccess\OAB\.
Important: The OAB is no longer "distributed" to Client Access Servers for distribution, a result the Exchange File Distribution Service was removed in Exchange 2013.  I will explain how clients gain access to the OAB files in the next section "OAB Virtual Directory".

Like before, OAB Generation runs according to a schedule which is now defined on the mailbox servers.  The default schedule is to process the OAB every 8 hours over a period of 1 hour.

  • The OABGeneratorWorkCycle parameter specifies the time span in which the OAB generation on the specified server will be processed.
  • The OABGeneratorWorkCycleCheckpoint parameter specifies the time span at which to run OAB generation.
It is important to set these values across all Mailbox servers the same to ensure in the event a database failover occurs, the new server responsible for generating the OAB will continue to adhere to the set schedule.

It is also possible to force OAB Generation.  Despite a complete architecture change in OAB Generation, Microsoft was nice enough not to change the command which generates the OAB.  To forcefully generate all Offline Address Books across your environment, simply run the following PowerShell command:

Get-OfflineAddressBook | Update-OfflineAddressBook

 
As mentioned above OABGeneratorAssistant will first generate to the OrganizationCapabilityOABGen Arbitration Mailbox and then copy the files to the mailbox server performing running OABGeneratorAssistant.  Depending on how many users it may take a few minutes to complete and copy to the mailbox server.
 
Like before, each OAB will be represented by a GUID.  You will know when the process finishes as the Date modified on the OAB files will update.
 
 
If you would like to track the generation process simply look at the event logs for the following events upon an OAB Generation.


By default in a new installation of Exchange 2013 there is only one mailbox which contains the OAB as mentioned above SystemMailbox{bb558c35-97f1-4cb9-8ff7-d53741dc928c}.  Companies however can create additional Arbitration mailboxes which have the OAB Gen capability.  This can be done for redundancy encase the SystemMailbox{bb558c35-97f1-4cb9-8ff7-d53741dc928c} became corrupt or for servicing users which are geographically distributed.  For example, a company with offices in Australia and Europe will want the OAB Generated locally in each continent and ensure users are not downloading OABs across international links.
 
When there are multiple Arbitration mailboxes which are configured with OrganizationCapabilityOABGen, multiple mailbox servers hosting the active databases will be responsible for performing OAB Generation.
 
To configure additional Arbitration mailboxes with the OrganizationCapabilityOABGen simply use the following PowerShell command:
 
New-Mailbox -Arbitration -Name "OAB Australia" -Database Leeming-DB1 -UserPrincipalName OABAustralia@avantgardetechnologies.com.au –DisplayName "OAB Mailbox for Australia"
 

Next to configure the OrganizationCapabilityOABGen ability, run the following PowerShell command against the mailbox.
 
Set-Mailbox -Arbitration OABAustralia -OABGen $true
 
 
This pretty much sums up the new OABGeneratorAssistant in Exchange 2013.  I also recommend reading an article I posted on Mimecast towards the end of last year entitled "The New OAB Generation, the Good and the Bad".  Whilst the new OAB Generation has removed the single point of failure in the Exchange 2007/2010 design, there are new challenges which are present for companies in multi-tenant configurations.  The article published on Mimecast goes into this in more detail and can be found at the following address:
 
 
OAB Virtual Directory
 
The OAB Virtual Directory runs on all Exchange 2013 servers running the Client Access role.  This provides a way for Outlook clients to download the offline address book.  If you have a multi-role Exchange 2013 server, look in the Default Web Site (which is the Front End Client Access) under OAB.  Outlook clients connect to this for downloading the Offline Address Book.
 
 
Unlike Exchange 2007/2010, the Offline Address Book is no longer "distributed" to the Client Access servers however.  This can be shown by opening the web folder.


As you see there is no GUID representing any Offline Address Books or associated address book files.  Just the standard files relating to IIS exist.

 
This is because in Exchange 2013 Client Access servers now "proxy" the connections to the closest mailbox server holding an Arbitration mailbox with the OrganizationCapabilityOABGen.  If you only have one Arbitration mailbox with OrganizationCapabilityOABGen enabled (the default), but you have multiple sites, Client Access servers proxy these requests across WAN links to ensure users can download the OAB.

As I have both a Client Access (front end) and Mailbox (backend) on the same server, the proxy will simply pass through to the Exchange Back End website OAB folder which does contain the OAB as shown below:


If you would like information into what mailbox server the client access is proxying OAB requests to or any additional information regarding the proxying which is going on, view the OAB Proxy log files which can be found under:

%ExchangeInstallPath%\Logging\HttpProxy\OAB\

In the event a client access server finds more then one Arbitration mailbox with OrganizationCapabilityOABGen  enabled, the Client Access server will load balance the proxied requests automatically between the Arbitration mailboxes in a round robin fashion.

Now that you understand how Exchange client access proxies the requests you can see the importance to ensure additional OrganizationCapabilityOABGen capable Arbitration mailboxes exist at remote sites to ensure proxied traffic does not cross WAN links.

Autodiscover

Autodiscover is responsible for letting Outlook 2007-2013 clients know which Client Access server they should connect to for downloading the latest OAB.  I can view this by holding down CTRL and right click on the Outlook icon in my system tray I am able to click Test E-Mail AutoConfiguration.

The OAB URL in the output below shows where Outlook clients are connecting to for the OAB download.


It is possible to change the URL Autodiscover gives out on each Client Access server by modifying the Internal and External URLs.

  • The Internal URL is used by clients directly connected to the corporate network.
  • The External URL is used by clients connecting in remotely from the Internet.
My environment has split DNS configured so I'm using the same internal/external URLs.  If your using HTTPS the name entered must represent a name on your digital certificate.

To modify the path for the Internal URL in the example above, you would use the following command:

Set-OabVirtualDirectory -Identity "CASSERVERNAME\OAB (Default Web Site)" -InternalURL https://mail.mydomain.local/OAB -RequireSSL $true

To modify the path for the External URL in the example above, you would use the following command:

Set-OabVirtualDirectory -Identity "CASSERVERNAME\OAB (Default Web Site)" -ExternalURL https://mail.mydomain.com/OAB -RequireSSL $true

I hope this post has been helpful and I would like to thank you for reading.  Any questions feel free to send me an email at clint.boessen@avantgardetechnologies.com.au

Force SYSVOL Replication with File Replication Service (FRS)

$
0
0
As an administrator you may make a group policy change on the domain controller running the PDC emulator and you want this change to be replicated out to a branch location immediately.  Instead of waiting for the FRS replication interval, you can force the replication to the branch site.  This is done by using the ntfrsutl command.

In this example DC1 is the domain controller in the corporate HQ site running the PDC emulator and DC2 is a domain controller in a branch site.  To force the SYSVOL to be replicated to the branch location, simply run the following command on DC1, the server which you want to replicate from:

ntfrsutl forcerepl DC1.domain.local /r "domain system volume (sysvol share)" /p DC2.domain.local

If the command executes correctly you will see the following output:

LocalComputerName = DC1.domain.local
ReplicaSetGuid = (null)
CxtionGuid = (null)
ReplicaSetName = domain system volume (sysvol share)
PartnerDnsName = DC2.domain.local

Check the sysvol on the branch location and make sure the replication has occurred successfully!

Cannot Delegate Control - Only Shows Contacts!

$
0
0
I had a problem at a customer where users could not delegate other users access to their Exchange mailbox.  When a user opens up their delegates and clicks Add they cannot see the Global Address List, and hence cannot delegate access.

 
It only showed the All Contacts list, and of course contacts are not accounts and do not have access to network resources so they cannot be used for permission delegation.
 
 
This Exchange environment had just undergone cross-forest migration from an Exchange resource forest so there are a number of quirks which are popping up needing resolution.

After investigating I saw on the Default Offline Address Book that it included the Global Address List and the following "All Contacts" address list.

 
I removed the All Contacts Address List:
 
 
Then forced the OAB to regenerate with:
 
Get-OfflineAddressBook | Update-OfflineAddressBook
 
Then redistributed it to the Client Access Servers with:
 
Update-FileDistributionService CASNAME
 
For more information on this process refer to:
 http://clintboessen.blogspot.com.au/2009/05/how-oab-distribution-works.html

Then re-downloaded the OAB with Outlook

 
The issue was then fixed:
 
 
Having an address list defined on the Offline Address Book does not generally cause problems in Outlook with the ability to see the GAL.  I'm not sure what happened in this environment as when I re-added the All Contacts address list I could not reproduce the problem.

Outlook Error - Your server administrator has limited the number of items you can open simultaneously.

$
0
0
One of my customers running a custom line of business application called Office Automator by Office Automation which integrates with Microsoft Outlook experienced problems were experienced when sending emails.  The Outlook client was configured to use a direct RPC to the Exchange server.  The error users were experiencing was as follows:

Error No: -2147220731

Your server administrator has limited the number of items you can open simultaneously. Try closing messages you have opened or removing attachments and images from unsent messages you are composing.


The customer was running a single Exchange Server 2010 SP1 multi role in the backend. It is important to note that the user had multiple Outlook sessions open having Outlook running locally on their desktop computer and a second session initiated as a RemoteApp from a remote desktop session host server.

In addition to the error being generated on the Outlook client, the following error was also being generated in the Exchange 2010 application logs on the mailbox server role.

Event ID: 9646
Source: MSExchangeIS

Mapi session 'GUID' exceeded the maximum of 250 objects of type "objtMessage".


This error was resolved by increasing the amount of maximum objtMessage calls a single MAPI session for a mailbox can create from 250 to 500.  This was done by adding the following registry key DWORD "MaxObjsPerMapiSession" to the following registry location:

HKEY_LOCAL_MACHINE\SYSTEM\CurrentControlSet\Services\MSExchangeIS\ParametersSystem


For more information on tweaking Exchange Store Limits in Exchange 2010 please review the following TechNet article:

http://technet.microsoft.com/en-us/library/ff477612(v=exchg.141).aspx

Hope this post has been helpful!

Outlook Meeting Request Randomly Sending Twice

$
0
0
I responded to a weird Outlook calendaring issue today involving an executive assistant to a CEO.  When the executive assistant send a meeting invite to a distribution group in particular "All Staff", the meeting request would send once and then again approximately 10 minutes later.  The customer was running Microsoft Exchange 2010 SP3 UR5 in a 2 node DAG (multi-role) with Outlook 2010 clients.

When told about it, I found this issue hard to comprehend so I went to the users computer and sent a test calendar invite out to All Staff and the Executive Group called "Please Ignore - IT Testing (please delete).  Needed to see it happen for myself!

The calendar invite went out first at 9:50am, then 13 minutes later resent at 10:53am without the user clicking a button.


After spending some time examining what was going on I checked message headers.  Whenever an email is relayed internally within an Exchange environment sent from OWA or Outlook, it will never have a message header.  The first email at 9:50am as expected had no header.  This screenshot is shown below.


Examining the second message which was sent at 10:53am does have a message header!


In the header notice under Content-Type it has "Apple-Mail".

Subject: Please Ignore - IT Testing (please delete)
From: ea@company.com
Content-Type: multipart/alternative;
               boundary="Apple-Mail-BE8A5DA5-12DD-4165-80F3-CB2112C97133"
Message-ID: 781CC260-A1EA-4FB2-B82F-0624F349F9AE@company.com
Date: Wed, 2 Apr 2014 10:53:03 +0800
To: "ea@company.com" ea@company.com,
Michael Smith mdto@company.com,
Executive Group ExecutiveGroup@company.com,
All Staff AllStaff@company.com
Content-Transfer-Encoding: 7bit
MIME-Version: 1.0 (1.0)


After some more digging I found out the executive assistant has an Apple iPhone connected with Active Sync to her Exchange mailbox.  Her iPhone 4 was running Apple IOS 5.1.1 (9B206) where the latest version at the time was 7.1 (11D167), her phone was well out of date.

We upgraded her phone to the latest version 7.1 and it resolved the issue.  Very weird problem!

Export List of Remote Desktop Service Logons from an RD Session Host

$
0
0
Sometimes as an administrator you may be required to create a detailed report of all Remote Desktop session logon's to a RD Session Host for auditing purposes.  All logon requests to a terminal server are recorded to TerminalServices-LocalSessionManager in the event log.

 
Simply tap into this with the Get-WinEvent PowerShell cmdlet.  The following PowerShell command will create you a spreadsheet in CSV format :
 
Get-WinEvent -LogName Microsoft-Windows-TerminalServices-LocalSessionManager/Operational | select TimeCreated,Message | Export-Csv c:\output.csv -NoTypeInformation

Delete all folders under a sub folder older then X days

$
0
0
Below is a simple PowerShell script which deletes all folders under D:\test older then 2 days.  Have fun!

$Now=Get-Date
$Days="2"
$TargetFolder="D:\test"
$LastWrite=$Now.AddDays(-$Days)
d:
cd"D:\test"
$Folders=get-childitem-path$TargetFolder|Where{$_.psIsContainer-eq$true}|Where{$_.LastWriteTime-le"$LastWrite"}

   
foreach($Folderin$Folders)
   
{
   
write-host"Deleting $Folder"-foregroundcolor"Red"
   
Remove-Item$Folder-recurse-Confirm:$false
   
}
   

Recursively Remove Mailbox Folder Permissions

$
0
0
You have been assigned a task to recursively remove mailbox permissions from a user mailbox in Exchange 2010/2013 using Exchange Server management tools.  How would you go about doing this?

Well there is a PowerShell command in Exchange called "Remove-MailboxFolderPermission" but this command only allows you to remove permissions from one folder at a time.  This cmdlet does not have a -Recursive option to allow you to propagate this against all sub folders.  The Set-MailboxFolderPermission, Remove-MailboxFolderPermission and Get-MailboxFolderPermission commands can be run by users who are a member of any of the following groups:
  • Organization Management
  • Recipient Management
  • Help Desk
I can run these commands as a member of the Organization Management role group against any user in my environment as shown in the following screenshot:


Now if we want to recursively remove mailbox folder permissions from all folders within a mailbox, we still need to use the Remove-MailboxFolderPermission command however we need to pipe this command into another command allowing us to recursively move through all the folders in the mailbox as the Remove-MailboxFolderPermission does not support the recursive action.  This can be done with the following command:

Get-MailboxFolder -Identity Bugs.Bunny:\FolderName -Recurse | Remove-MailboxFolderPermission -User username

At this point however you may hit another problem.  The Get-MailboxFolder cmdlet must be run under the user context who owns the mailbox.  For example, I want to use the Get-MailboxFolder cmdlet which is required in the above command to view the Inbox folder of my bugs.bunny test user.  To do this I run the following PowerShell command under my Administrator account which is a member of "Organization Management" but I get the following error:

Get-MailboxFolder Bugs.Bunny:\Inbox

The specified mailbox "bugs.bunny" doesn't exist.   
+ CategoryInfo          : NotSpecified: (0:Int32) [Get-MailboxFolder], ManagementObjectNotFoundException   
+ FullyQualifiedErrorId : 2DCA0FEB,Microsoft.Exchange.Management.StoreTasks.GetMailboxFolder


If I run the same PowerShell command under the security context of bugs.bunny however, we will not have any issues.  For example in the following screenshot I have the Exchange Management tools installed on a Windows 7 PC.  I am going to run the Exchange Management Shell as the bugs.bunny user account and run the same command.

 
Now that my Exchange Management Shell is running as bugs.bunny, when I run the command I will receive no error.
 
Get-MailboxFolder Bugs.Bunny:\Inbox


Important: The Get-MailboxFolder command must be utilised under the security context of the user whom owns the mailbox.

Now that we understand the limitations with the Get-MailboxFolder cmdlet, we understand that in order to recursively remove mailbox permissions from a mailbox, we must run the following command under the security context of the user account in order for the Get-MailboxFolder recursive command to work successfully.

Get-MailboxFolder -Identity Bugs.Bunny:\FolderName -Recurse | Remove-MailboxFolderPermission -User username

This method is not efficient as it involves the administrator contacting the user to gain access to their personal password.

There is however an alternative method for recursively removing permissions on a user mailbox using ExFolders, the new version of PFDavAdmin.  Download the ExFolders tool from the following TechNet URL:

http://gallery.technet.microsoft.com/Exchange-2010-SP1-ExFolders-e6bfd405

Once downloaded follow the instructions in the readme.txt file to install the tool and copy it to the Exchange bin folder.  ExFolders allows you to browse permissions on any of the sub folders of a users mailbox by simply right clicking on the folder and navigating to permissions.


If you want to recursively change permissions, simply right click on the folder tree you want to recursively remove the permissions from and click "Propagate folder ACEs".

 
Select the user which you want to remove from all sub folders and click Remove.
 
 
This will go through every sub folder in the hierarchy and remove the permissions.
 
 
Note: If the user you want to remove has been granted rights to only specific sub folders throughout the hierarchy, add the user to the root folder first so you are able to select the user.  For example if my Hulk Hogan user account had permissions to the alerts folder and one of my MVP folders, I would not be able to select the user from the root of the Inbox folder as it does not exist at this level.  By adding it to the root of the Inbox folder first, I am able to select the user for a recursive remove.
 
Important: Before you can use ExFolders you must have full mailbox access of the recipient for which you are looking to modify.  You can grant this using Exchange Management Console (EMC) by selecting "Manage Full Access Permission".  See in the screenshot I provided the AT\Administrator account rights which is the account I used to run ExFolders.


Changing Mailbox Permissions in Exchange Not Working

$
0
0
Over the years I have had numerous customers contact me and complain that when they change mailbox permissions such as "Manage Full Access Permissions" in the GUI or by changing permissions in Exchange Management Shell, the permissions do not apply to end users.  Other times administrators remove permissions to a mailbox and complain that the user still has access to the mailbox.

I always end up explaining to my customer "the change will work, just wait longer".  I want to take a few seconds to look into what is happening.

When you change permissions on a mailbox, the permission is not being set on the mailbox but in fact in Active Directory.  It takes time for the Exchange server to commit the change made to the information store.  This is due to the MBI cache which runs on the Exchange information store.

The information store caches information contained in the directory store and by default re-reads it every 120 minutes.  Any change made to Active Directory such as a mailbox permission change is not read by the information store for at least 2 hours.  It is also important to note that if the information store is idol (not busy) for over 15 minutes it can update its MBI cache faster from Active Directory.

Is there a way I can force the permission change made to the Exchange server?  Yes there are two ways of achieving this:
  • Reboot the Exchange Server
  • Restart the Information Store service
Both of these methods will result in down time.

It is also possible to tweak how often the MRI cache is updated by the information store service by modifying the registry.  The MRI cache is controlled by two registry settings, "Mailbox Cache Age Limit" and "Mailbox Cache Idle Limit".  The default for these settings are as follows:

Mailbox Cache Age Limit = 120 minutes
Mailbox Cache Idle Limit = 15 minutes

These registry values are REG_DWORD and are located under:

HKEY_LOCAL_MACHINE\SYSTEM\CurrentControlSet\Services\MSExchangeIS\ParametersSystem

NOTE: This registry entry is not a switch, it is a setting. If it is set to 1 the server rereads the cache every minute; if it is set to 2 the server rereads the cache every 2 minutes, and so forth.

If you change these registry keys you must restart the information store service for the change to take effect.

For more information about these registry values please see:

http://technet.microsoft.com/en-us/library/aa996988.aspx

As a general rule of thumb I would not recommend companies modify these default values, there is no need for it.  Just be patient and your permission change will automatically take effect.

In regards to Exchange 2013 I'm not sure if it follows the same behaviour as previous versions of Exchange such as 2007/2010.  In Exchange 2013 the information store has been overhauled and has been divided into separate worker processes responsible for each database.  Due to these architecture changes, the MBI cache may work/update differently.  If you are reading this and have experience with MRI cache and Exchange 2013, please feel free to comment below and share the knowledge!

Problems Removing WSUS from SBS 2008

$
0
0
Once upon a time (approximately 4 years ago) I built an SBS 2008 server for a small business,  everything worked, everything was automated and the customer was very happy.  I was engaged to build this server, deploy the workstations and setup the network infrastructure but not maintain it.  Four years later the customer tracks me down by and calls me back with a mountain of problems.  The integrator here in Perth Western Australia (which will remain nameless) turned my perfect SBS deployment into a nightmare of problems due to unexperienced engineers performing server work - something which is far to common here in Australia.

One of the problems I faced was with the Windows Software Update Services, the service which "deploys updates" to computers on the network.

I found the "Update Services" service in a disabled state, the Windows Internal Database (WID) SQL Instance was completely missing from the server.  As a result the Windows Server Update Services mmc console would simply not launch and crash.  Starting the Update Services service also did not help improve the situation due to the missing SQL WID database.

Running a "wsusutil reset" simply failed due to the lack of database!

Fatal Error: A network-related or instance-specific error occurred while establishing a connection to SQL Server. The server was not found or was not accessible. Verify that the instance name is correct and that SQL Server is configured to allow remote connections. (provider: Named Pipes Provider, error: 40 - Could not open a connection to SQL Server)

 
Attempting to uninstall WSUS resulted in the following error messages:
 
The Windows Server Update Services 3.0 SP2 was not removed successfully because an error occurred.
 
 
Attempt to un-install Windows Server Update Services failed with error code 0x80070643.  Fatal error during installation
 
 
These uninstall errors were being caused because the SQL database no longer exists.  To remove a WSUS server which is missing its SQL database I found that you need to modify the following registry key:
 
 HKLM\Software\Microsoft\Update Services\Server\Setup
 
DWORD: wYukonInstalled
 
Set the decimal value to 0
 
 
Repeat the uninstall process (make sure you select not to remove the SQL database) as part of the uninstall and it will complete successfully.
 
 
After performing the uninstall, a simple server reboot was required before I re-installed WSUS using Windows Server 2008 Server Manager.
Viewing all 343 articles
Browse latest View live