Quantcast
Channel: Clint Boessen's Blog
Viewing all 343 articles
Browse latest View live

Dealing with Health Proxy Probe Messages in Exchange 2013 Managed Availability

$
0
0
Exchange 2013 introduces a new feature called Managed Availability which performs system monitoring of various components of Exchange infrastructure and provides the ability to detect and recover from problems as soon as they occur.  One of the tests Exchange Managed Availability performs is to send an "Inbound Proxy Probe" message once ever 5 minutes from an Exchange 2013 front end server to the backend server.  If you have a multi-role server deployment, this proxy probe occurs locally on the Exchange 2013 server between the frontend mail service "Microsoft Exchange Frontend Transport" and the backend transport service "Microsoft Exchange Transport". The purpose of this test is to ensure transport functionality is working as expected between these components.

This test however can be problematic and two issues are often seen by Exchange Administrators including:
  • In the event Content Filtering (Intelligent Message Filter) is configured on the Exchange 2013 backend with the install-AntispamAgents.ps1 script, Inbound Proxy Probe messages will be quarantined, rejected or deleted by the spam filtering engine.
  • The Inbound Proxy Probe messages get delivered to the Exchange 2013 backend health mailbox and stored - these can build up over time causing clutter.
Both of these issues have been addressed below.

Exchange Content Filtering Blocking Probe Messages

Exchange Content Filtering can block messages relayed between the Exchange 2013 front end and Exchange 2013 back end.  In my lab environment I have a Spam Confidence Level (SCL) set to 5 then quarantine, this is resulting in a large volume of probe messages being quarantined in my spam mailbox as shown below.


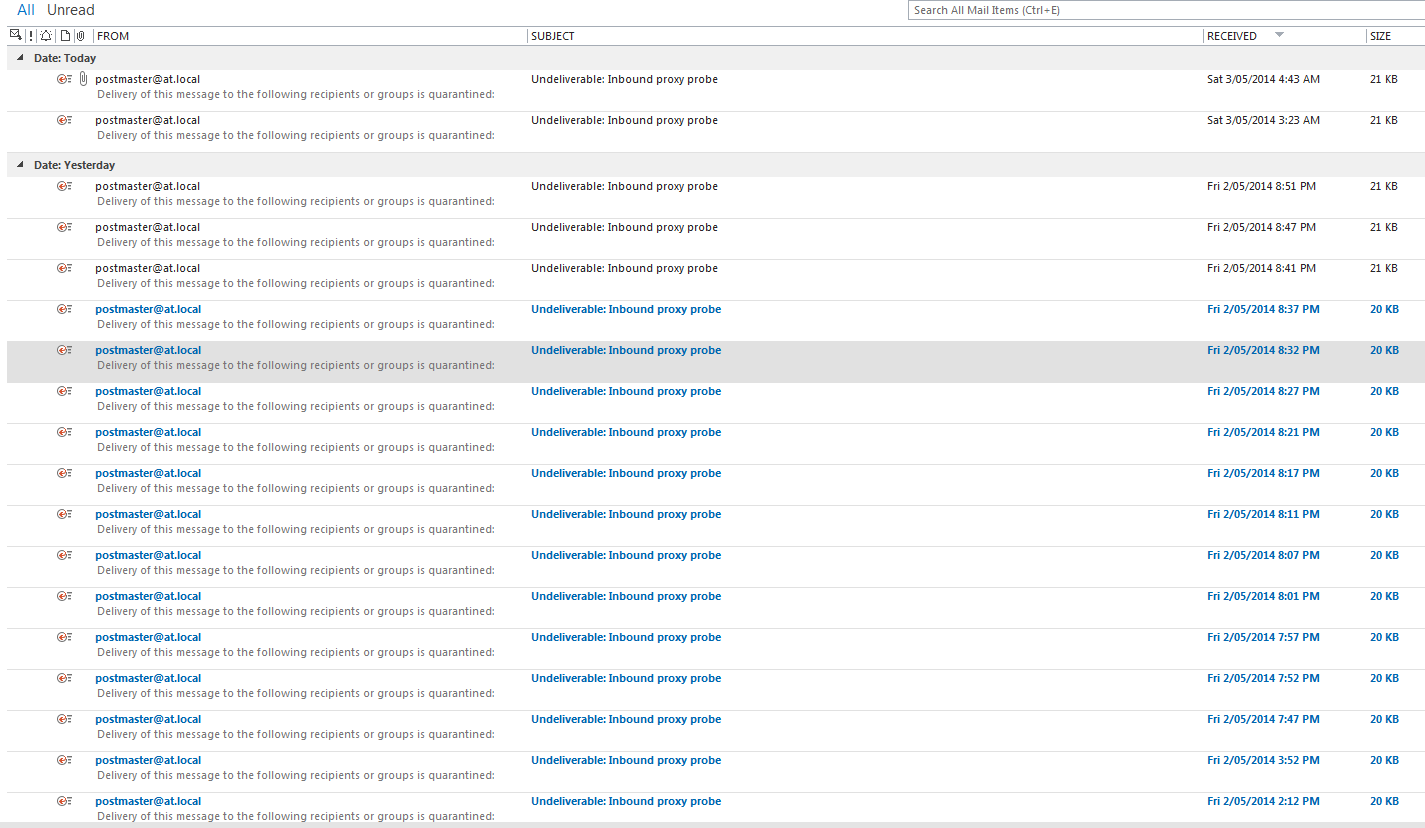
In my lab environment these "Subject: Inbound proxy probe" messages are being sent from postmaster@at.local to inboundproxy@contoso.com (the address for the inbound proxy as from Exchange 2013 SP1).


To stop these messages from being caught by Intelligent Message Filter simply put in an exclusion by using the Set-ContentFilterConfig command.  In my environment the command I used was as follows:

Set-ContentFilterConfig -BypassedSenders postmaster@at.local -BypassedRecipients inboundproxy@contoso.com

The messages were coming from the sender postmaster@at.local and the recipient was inboundproxy@contoso.com, as a result this exclusion stops IMF from detecting these messages as potential spam.

Build Up of Health Probe Messages

As Inbound proxy probe messages are sent ever 5 minutes, a build up of these messages can accumulate on the Exchange 2013 backend health mailboxes.  To view the health mailboxes in an Exchange Management Shell, use the Get-Mailbox command with the -Monitoring switch.  To view item counts of the health mailboxes, run the following command

Get-Mailbox -Monitoring | Get-MailboxStatistics | ft DisplayName,ItemCount,LastLogonTime


Note: Every Mailbox Database contains two health mailboxes in Exchange 2013 by default.

As you see in my environment, my health mailboxes have a large build up of probe messages shown by the item count.  To control the build-up of messages in the health mailboxes, you can simply leverage Exchange Retention - something which has been around for a while in Exchange!  To do this you need to create both a retention policy and a retention tag which can be done with Exchange Management Shell (EMS) or by using the new Exchange Administration Centre (EAC).

First Create a Retention Tag, I called mine "Delete items older then 2 days" and configured the tag as follows:

 
Then create a Retention Policy and link the Tag.  I called my Retention Policy "Health Mailbox Retention Policy".
 
 
Apply the retention policy only to your Health Mailboxes which can be done with the following command:
 
Get-Mailbox -Monitoring | Set-Mailbox -RetentionPolicy "Health Mailbox Retention Policy"
 
Check that it applied with the following command:
 
Get-Mailbox -Monitoring | fl *RetentionPolicy*
 
Now the Managed Folder Assistant will automatically delete emails older then two days.  The Managed Folder Assistant is always running and begins cleaning emails at times when the server is at low utilisation as to not disrupt business, however you can force the Managed Folder Assistant to do the first initial clean-up of your health mailboxes with the following command:
 
Get-Mailbox -Monitoring | Start-ManagedFolderAssistant
 
After it finishes its initial cleanup, you will notice the item count within these health mailboxes has significantly reduced.


Note: In the event you create additional mailbox databases, new health mailboxes will be created.  Ensure you link the retention policy to any new health mailboxes.

RBL Providers and Exchange 2013

$
0
0
In this post I want to address Real Time Blocklist Provides and Exchange 2013 as there are some differences you need to be aware of.  Please note RBLs are often also referred to as DNS Block Lists or DNSBL.

As you may be aware now, the Exchange Transport stack has been separated into a backend and front end role.  The Front End Transport component runs on the Client Access Server and the Backend Transport component runs on the Mailbox Server role.  If you deploy a multi-role server, both of these components reside on the same server but still work independently as separate services called "Microsoft Exchange Frontend Transport" and "Microsoft Exchange Transport".

In previous versions of Exchange such as Exchange 2007/2010, when you enabled anti-spam filtering on an Exchange server using the install-AntispamAgents.ps1 script, it would install both the Connection Filtering and Content Filtering transport agents on the same Transport service, as there was only one Transport service running on the Hub Transport role.  Now in Exchange 2013 as there are separate transport services, the anti-spam functionality of these roles has been split across the transport services.

Connection Filtering such as IP Block Lists, IP Allow Lists and RBL Providers now run on the Front End Transport Service.  Content Filtering including the Exchange Intelligent Message Filter (IMF) runs on the Exchange Backend Transport service.  In addition to the Content Filtering agent a new agent has also been added to the backend called the Malware Agent which is responsible for detecting viruses in email messages.  The new architecture has been shown below:

 
When you have a multirole deployment of Exchange 2013 with both Client Access and Mailbox roles on the same server, the Install-AntispamAgents.ps1 script will only configure the backend transport service for anti-spam functionality meaning the content filtering agent will be installed.  This means if you add any block list providers with the Add-BlockListProvider cmdlet, these will not function as a Connection Filtering agent is not available.
 
To ensure Connection Filtering is available, install the Connection Filtering agent with the Install-TransportAgent cmdlet.  This can be done with the following PowerShell command:
 
Install-TransportAgent -Name "Connection Filtering Agent" -TransportService FrontEnd -TransportAgentFactory "Microsoft.Exchange.Transport.Agent.ConnectionFiltering.ConnectionFilteringAgentFactory" -AssemblyPath "C:\Program Files\Microsoft\Exchange Server\V15\TransportRoles\agents\Hygiene\Microsoft.Exchange.Transport.Agent.Hygiene.dll"
 
 
After you have installed the agent you must then enable it and restart the Front End Transport Service with the following command:
 
Enable-TransportAgent -TransportService FrontEnd -Identity "Connection Filtering Agent"
 
Restart-Service MSExchangeFrontEndTransport


Next you can begin adding the RBL providers you wish to utilise such as the popular "Spam Haus" provider with the following PowerShell command:

Add-IPBlockListProvider -Name zen.spamhaus.org -LookupDomain zen.spamhaus.org -AnyMatch $true -Enabled $true

I added the following RBL providers in my environment:


You can verify that both the front end Connection Filter agent and back end Content Filter agents are installed and working by using the Get-TransportAgent commands as follows:

Get-TransportAgent


Get-TransportAgent -TransportService FrontEnd


The Connection Filter Agent logs get saved to the following location by default, after a few days of operating I can see log files accumulate.  This directly will automatically get created as soon as the Connection Filter Agent attempts to write a log file so it wont be created straight away upon agent installation.

C:\Program Files\Microsoft\Exchange Server\V15\TransportRoles\Logs\FrontEnd\AgentLog


To get a summary on your top RBL Providers from these log files run the following command:

.\get-AntispamTopRBLProviders.ps1 -location "C:\Program Files\Microsoft\Exchange Server\V15\TransportRoles\Logs\FrontEnd\AgentLog"


HP Proliant MicroServer G7 N40L not working with 2012 R2

$
0
0
The HP Proliant MicroServer G7 N40L is a great lightweight server perfect for small business and home use.  However with the release of Windows 8.1 and Windows Server 2012 R2 you may find problems booting the operating system.  After completing the installation, on first boot it will hang on "Getting devices ready" forever.  This is due to the on-board Broadcom NIC which has issues with only Windows Server 2012 R2 and Windows 8.1

There are a few forum threads on the Internet about this issue including:

http://forum.wegotserved.com/index.php/topic/29031-hp-microserver-n40l-windows-81-installation-problems/

http://forums.whirlpool.net.au/archive/2179812

HP has released a BIOS firmware update which resolves this issue by updating the firmware to 2013.10.01 (A) (15 Nov 2013).  This firmware update is packaged in "SP64420.exe" and is available for download from the following HP website.

http://h20566.www2.hp.com/portal/site/hpsc/template.PAGE/public/psi/swdDetails/?sp4ts.oid=5336618&spf_p.tpst=swdMain&spf_p.prp_swdMain=wsrp-navigationalState%3Didx%253D%257CswItem%253DMTX_57720d956df94dfcbaa0e28256%257CswEnvOID%253D4064%257CitemLocale%253D%257CswLang%253D%257Cmode%253D%257Caction%253DdriverDocument&javax.portlet.begCacheTok=com.vignette.cachetoken&javax.portlet.endCacheTok=com.vignette.cachetoken

Unfortunately to be able to download this package from HP, your server must be under warranty or you must have a special account on the HP website.  I find this ridiculous as it is clearly a bug with the current firmware and if your server is out of warranty this means you can never upgrade the operating system!  What a joke!!

Luckily, I have uploaded this BIOS update to my Google hosting to ensure anyone who finds themselves in the same situation as me is able to get the SP64420.exe and update their BIOS for a HP Proliant MicroServer G7 N40L allowing them to run Windows 8.1 or Windows Server 2012.  This download is available from the following link:

https://sites.google.com/site/cbblogspotfiles/SP64420.zip

How to Delete Files which exceed 255 Characters Without 3rd Party Tools

$
0
0
Windows Explorer and many Windows applications including PowerShell are limited to 255 characters max file path.  Whilst this limitation is in place at an application level, the NTFS file system does not support this limit.  In fact file paths can be created remotely over the SMB protocol to exceed this limit which is how most file servers get stuck with folder paths administrators can no longer maintain using the native Windows Explorer application.

When attempting to delete folders using Windows Explorer the following errors may be experienced:

The source file name(s) are larger than is supported by the file system. Try moving to a location which has a shorter path name, or renaming to shorter name(s) before attempting this operation.

 
An unexpected error is keeping you from deleting the folder. If you continue to receive this error, you can use the error code to search for help with this problem.
 
Error: 0x80004005: Unspecified error
 
 
Even new applications from Microsoft such as PowerShell do not support file paths longer then 255 characters despite this being supported by NTFS.
 
Remove-Item: The specified path, file name, or both are too long.  The fully qualified file name must be less than 260 characters, and the directory name must be less then 248 characters.
 

I am going to show you a way to remove excessively long file paths without using third party tools such as Long Path Tool which come at a price or booting into different operating systems such as Linux to remove the unwanted file paths.

One Microsoft application which is not limited to the 255 character limit is robocopy.exe.  I know this as I often move large volumes of data with Robocopy between server infrastructure and have never been hit with a file path limitation.  As a result, this is the tool I chose to remove the data.

If you use robocopy with the /MIR switch, it will make the destination folder exactly the same as the source folder.  So if the source folder is empty, it will delete all data in the destination empty and in result deleting the content.

I have a path here with 3 users which have folder structures which exceed 255 characters.  Windows Explorer failed to remove these folders.


I created an empty folder on C:\ called test then used the mirror switch to copy the test folder to the HomeDrives folder.

robocopy /MIR c:\test E:\UserData\HomeDrives


 After running the command all my user folders under E:\UserData\HomeDrives were deleted.

This is a handy trick for dealing with folders on file servers which have excessive amounts of long folder structures which exceed the 255 character limit.

Hope this has been helpful, feel free to leave me a comment below.

V-79-57344-38260 - Unable to create a snapshot of the virtual machine

$
0
0
In this post I am going to shed some light on a very common error in Backup Exec 2010, 2012 and 2014 when performing VM backups from a VMware Hypervisor.  The error experienced is:

V-79-57344-38260 - Unable to create a snapshot of the virtual machine. The virtual machine no longer exists or may be too busy to quiesce to take the snapshot.

This error is extremely generic and can be one of 10 possible problems.  For a list of all possible problems see the following knowledge base article from Symantec:

http://www.symantec.com/business/support/index?page=content&id=TECH146397

The most common cause which is not documented heavily on the Internet is the lack of the Storage APIs.  The Storage APIs are only available in VMware vSphere Standard Edition and higher.  If your using the free version of ESXi, you will not have the Storage API and hence your backups will not work.  Check the licensing page on your ESX host to see if you have the Storage API in your license key:
 If you don't have it, upgrade your license key and success will be yours :).

PowerShell - Locate Missing SYSTEM Permissions from Folder Structure

$
0
0
I am in the middle of a DFS-R project for a customer where I'm provisioning new Windows Server 2012 R2 file servers and migrating the data across to the new server.  To perform the migration I initially performed the pre-sync of the data with robocopy in backup mode "/b" then added the new servers to the DFS-R replication group/namespace.  Once the initial DFS-R sync had completed which took a few days, I enabled the namespace for the new servers and disabled the old servers.

Upon cutting the users across, many users complained the data was approximately 7 days old which is the approximate time I did the initial robocopy.  After further investigation it appeared DFS-R was not keeping the data in sync and many directories had not been replicated.  These files and folders which were not replicated also did not appear in the backlog count under DFS-R Health Reports which were run to verify replication status.

It turned out the cause of this issue was because the "SYSTEM" permissions were missing from many directories in the file server structure.  As the DFS-R service runs under the "SYSTEM" account, it must have access to the data in order to perform replication.  Robocopy was however able to move this data as it was running in backup mode which uses VSS to snapshot the data.

This directory structure utilised block policy inheritance numerous times throughout the folder structure and as a result finding directories which did not have SYSTEM permissions configured correctly was a challenging task.  As a result I wrote a PowerShell script which performs an audit against a directory structure and returns all folders which are missing the "SYSTEM" permission so that an Administrator can manually add the missing permission at all folder levels with inheritance broken.

This is a handy script and I posted it online for everyone as I recommend running it against any directory structure on file servers to ensure the SYSTEM account has full control over all data, a recommended Microsoft best practice.

$OutFile="C:\Permissions.csv"
$RootPath="E:\PATHTOBESCANNED"

$Folders=dir$RootPath-recurse|where {$_.psiscontainer -eq$true}
foreach ($Folderin$Folders){
       $ACLs=get-acl$Folder.fullname |ForEach-Object { $_.Access  }
     $Found=$False
       Foreach ($ACLin$ACLs){
    if ($ACL.IdentityReference -eq"NT AUTHORITY\SYSTEM")
        {
            $Found=$True
        }
       }
             if ($Found-ne$True)
        {
             $OutInfo=$Folder.FullName
             Add-Content-Value$OutInfo-Path$OutFile
         }
    }

I hope this PowerShell script helps other people out there!

PowerShell - Nightly DFS-R Database Backups

$
0
0
Windows Server 2012 R2 provides a new feature allowing customers to export and import the DFS-R database located in "System Volume Information" for any volumes with folders partaking in DFS-R replication.  For more information about this new feature, please see the following TechNet article which I strongly recommend a read over:

http://technet.microsoft.com/library/dn482443.aspx

The ability to Export and Import the DFS-R database provides the following advantages:
  • Significantly reduces the amount of time the initial sync process takes when pre-staging new file servers to partake in DFS-R replication as the DFS-R database can be exported and imported into the new server.  This process also requires the data be copied through robocopy or a backup product (such as ntbackup or wbadmin) and ensure the data is exactly the same as the source server.
  • Provide the ability to restore a corrupt DFS-R database which can be caused by incorrect shutdown of a Windows Server running DFS-R.  When a DFS-R database goes corrupt the server automatically kicks of self recovery by default which involves cross checking the file hashes against every file for the replication groups volume against the other DFS-R servers in the cluster in order to repair the state of the database.  This process can take a long time, sometimes as long as the initial sync process backlogging all new replication traffic.
Some DFS-R environments consist of a single hub server and up to 100 spoke servers with large volumes of data sometimes exceeding 10TB with over 10 million files.  In this scenario if the DFS-R database suffered corruption on the hub server, this would result in the entire DFS-R replication backlogging for weeks while the self recovery process rechecks all the files across the environment!

I have a customer with a DFS-R environment similar to the example provided above.  As a result I put in place measures to recover the DFS-R database in the event corruption occurred.  A PowerShell script was created to automatically backup the database on a nightly basis using the new Export-DfsrClone cmdlet introduced in Windows Server 2012 R2 which runs on the hub server.  In the event corruption occurs, we can simply import the database using the new Import-DfsrClone cmdlet.

This PowerShell Script performs the following:
  • Creates backups under C:\DfsrDatabaseBackups
  • Each backup is placed in a folder labelled YYYY-MM-DD HH-mm"
  • The script automatically deletes any database backups older then 14 days by default to ensure old backups are cleaned up.

#DFSR Database Backup Script - Created by Clint Boessen 15/04/2014
$basefolder="C:\DfsrDatabaseBackups"
$datefolder=get-date-format"yyyy-MM-dd HH-mm"
$backuplocation=$basefolder+"\"+$datefolder
New-Item-ItemTypedirectory$backuplocation
Export-DfsrClone-VolumeE:-Path$backuplocation-Force

#Remove Databases older then 14 Days
$Now=Get-Date
$Days="14"
$LastWrite=$Now.AddDays(-$Days)

c:
 
 
cd$basefolder

$Folders=get-childitem-path$basefolder|
Where {$_.psIsContainer -eq$true} |
Where {$_.LastWriteTime -le"$LastWrite"}

foreach ($Folderin$Folders)

{
write-host"Deleting $Folder"-foregroundcolor"Red"
Remove-Item$Folder-recurse-Confirm:$false
}
 

Add the above script to a PowerShell script "ps1" file and create a scheduled task on your DFS-R file server to run the script according to a schedule in which you want DFS-R database backups to occur.  Once configured, you will see DFS-R database backups occurring on a regular basis according to your schedule with old backups automatically being cleaned automatically!


I scheduled my script to run at 5am on weekdays.  Please not the backup process can take hours, in my environment due to large amount of files the export is taking a total of 3 hours finishing around 9am which you can see by the date modified timestamp.

It is important to note, DFS-R replication will not work when a database backup is occurring.  As a result please ensure the backups are scheduled at a time when replication can be paused.  Replication automatically resumes after the export process is completed.

Could not initialize the capture device - EasyCAP DC60 Video Capture

$
0
0
I purchased a USB EasyCap DC60 Video Capture Adapter + Software for my parents to convert a load of home video tapes to digital for permanent storage.  This device is cheap - you can buy it online for around $10 USD and encodes great digital video in a variety of popular formats.


After the EasyCAP dongle arrived in the mail, I installed the Honestech HD DVR 2.5 software which came on the EasyCAP CD shipped with the device.  This software is used for recording video coming through the EasyCAP USB dongle and encoding it to a digital format you configure.  As for the driver for the EasyCAP DC60 Video Capture Adapter, the CD did not contain any driver files.

Windows 7 64bit automatically scanned its online driver repository for an appropriate driver and ended up detecting the EasyCAP dongle as a "Usbtv007" device.  The driver which Windows 7 64bit detected and installed was the incorrect driver and as a result, when attempting to open the Honestech HD DVR 2.5 software the following error was experienced:

Could not initialize the capture device


I spent over an hour on the Internet trolling through dodgy websites attempting to find a driver that works with Windows 7 x64 however none of the drivers downloaded matched the vendor and hardware ID's of the EasyCAP DC60 Video Capture Adapter which for my model are:

USB\VID_1B71&PID_3002&REV_0100
USB\VID_1B71&PID_3002


When I was about to give up, I stumbled across a forum thread which had a link to a driver download.  The forum thread wasn't in English so it was hard to make out however I know a download link when I see one.  This driver I downloaded matched the VID_1B71&PID_3002 Hardware ID's of the device.  I installed this driver and Walla - it worked!

To save someone the pain I went through to obtain a working driver for this device, I uploaded the driver which you can download from the following link below:

https://sites.google.com/site/cbblogspotfiles/UVG-002_driver-EasyCAP DC60.zip

Note: This ZIP contains both the 32bit and 64bit drivers.

When you install this driver the EasyCAP device will appear in Device Manager as OEM Capture.  Make sure you have the above Hardware ID's on your device before attempting to use this driver which can also be viewed in Device Manager.

Lastly if you have a Webcam, I recommend disabling the Webcam driver in Device Manager if you cannot easily disconnect it as the Honestech HD DVR 2.5 software can communicate with the Webcam instead of the EasyCAP device - at least that is what happened with me!

Hope this blog post saves someone the pain I went through!

ManagedBy - You don't have sufficient permissions. This operation can only be performed by a manager of the group.

$
0
0
This is a gotcha when dealing with the "Managed By" attribute of mail-enabled security and distribution groups.  I found in my environment running Exchange 2013 SP1 that I am unable to change group membership by either using Exchange Management Shell (EMS) or Exchange Control Panel (ECP).  The account I was using was both a Domain Admin and a member of the Organization Management security group.

I attempted to add myself to a group called "Avantgarde Users" to the ManagedBy attribute using Exchange Control Panel however received the following error message:

You don't have sufficient permissions. This operation can only be performed by a manager of the group.


Using the Exchange Management Shell the same problem was experienced.


Using the exact same administrative account, I was able to perform this task using Active Directory Users and Computers.


Once I added myself through Active Directory users and computers, my account appeared under ownership in Exchange 2013 Exchange Control Panel as normal.

EDIT: If you use the -BypassSecurityGroupManagerCheck switch on the PowerShell command it will work.  In my opinion it seem silly to check if your a manager of the group especially if a group has no managers.

Outlook - Changes to the distribution list membership cannot be saved. You do not have sufficient permission to perform this operation on this object.

$
0
0
In legacy versions of Exchange such as 2003 and 2007, when assigning a user "Managed By" permissions to an Active Directory security group, this allowed the users to manage the groups membership through Microsoft Outlook.  However in later reversions of Microsoft Exchange such as 2010 and 2013, simply providing the Managed By permission by default will not provide the user the ability to manage memberships of distribution groups.  This behaviour is by design in Exchange Server 2010 and Exchange Server 2013. Role Based Access Control (RBAC) and the associated self-service roles that accompany it were introduced in Exchange Server 2010. To prevent customers from unexpectedly causing problems with group management, the group management self-service role is now set to off by default.

When migrating to Exchange 2010 or Exchange 2013, when a user attempts change group membership for a group they are the owner of using Outlook 2010 or Outlook 2013, they will receive the following error message.

Changes to the distribution list membership cannot be saved. You do not have sufficient permission to perform this operation on this object.


You can turn this feature back on in Exchange 2010 or Exchange 2013 for all users by simply enabling the MyDistributionGroups setting on the Default Role Assignment Policy.


The Default Role Assignment Policy by default is applied to all mailboxes in an Exchange Organisation unless companies have created custom Role Assignment Policies and linked default or custom Management Roles to the custom Role Assignment Policy.  To demonstrate this, I have included a screenshot of my Mailbox below showing the Default Role Assignment Policy linked, this should be the same in most organisations unless you have custom RBAC requirements.

Note: The screenshot below is from Exchange 2013 SP1 but this also applies to Exchange 2010 which you will find by navigating through Exchange Management Console.


Now adding the option "MyDistributionGroups" to the Default Role Assignment Policy will provide all users with this policy linked to perform the following tasks:
  • Join existing groups (provided the Group allows it)
  • Manage some of the properties of groups they own
  • Change membership of groups they own
  • Create and Remove Groups
For majority of customers I work with, the first three meet requirements however the last point "Create and Remove Groups" raises concerns.  The default solution in Exchange 2010/2013 needs to be modified so that it meets the needs of the average customers - this means creating a custom Management Role with custom ManagementRoleEntries for the cmdlets we want the users to have permissions to.  Now if you are familiar with the Role Based Access Control (RBAC) model which Microsoft Exchange uses, you can go off and create your own which just has the cmdlets required which include:
  • Add-DistributionGroupMember
  • Get-DistributionGroup
  • Get-DistributionGroupMember
  • Get-Group
  • Get-Recipient
  • Remove-DistributionGroupMember
  • Set-DistributionGroup
  • Set-DynamicDistributionGroup
  • Set-Group
  • Update-DistributionGroupMember
Notice we left out the Add-DistributionGroup and Remove-DistributionGroup cmdlets hence allowing users to customise existing distribution groups but not add or delete distribution groups.

Introducing Manage-GroupManagementRole.ps1

Microsoft heard the pain customers were having with the default option made available in the RBAC Default Role Assignment Policy and as a result created a script called "Manage-GroupManagementRole.ps1" - written by Matthew Byrd from Microsoft.  This script is for a default deployment of Exchange 2010 or 2013 where all users have the Default Role Assignment policy and just want to be able to add/remove users from distribution groups through Microsoft Outlook for which they are owners of - just like they did before!  A copy of the script can be found here:

http://gallery.technet.microsoft.com/scriptcenter/8c22734a-b237-4bba-ada5-74a49321f159

This script does what I explained above for you automatically including:
  • Creates a new Management Role which you can specify with the -name switch otherwise by default it will call it "MyDistributionGroupsManagement"
  • Adds Management Role Entry's to the Management Role Group for all the PowerShell Commands listed above.  A Management Role Entry is simply a PowerShell cmdlet the Management Role is allowed to execute.
  • Assigns the Management Role to a Role Assignment Policy which can be specified with the -policy parameter.  If you do not specify a Role Assignment Policy it will use the default one, "Default Role Assignment Policy" which is by default assigned to all mailboxes in an Exchange environment.
When you have downloaded the script to run it with the Defaults simply type:

.\Manage-GroupManagementRole.ps1 -CreateGroup -RemoveGroup

This will create the management role called "MyDistrubtionGroupsManagement" and assign it to the "Default Role Assignment Policy" to apply to all users in the domain.


After running the script, people will be able to change Group Membership of distribution lists using Microsoft Outlook for only groups for which they are under the "Managed By" / "Ownership" attribute - just like how it was in previous versions of Exchange!

Some Gotcha's

For this functionality the Mail Enabled Group must be set as a Universal Group Scope.  Domain Local or Global Groups do not support this functionality.

In Exchange 2010 or Exchange 2013, you can only set User accounts to the Managed By / Ownership field.  No longer can you set Security Groups as ownership of another group - a limitation of RBAC.  You can however set multiple people to manage/own a distribution group.

There are a couple of other Gotcha's which can generate the "Changes to the distribution list membership cannot be saved" which are documented on Microsoft KB2586832 that can generate this error.  If your still having problems I recommend you have a read of the following article:

http://support.microsoft.com/kb/2586832

Powershell Find and Replace the Remote Desktop Services Profile

$
0
0
A customer of mine has configured all roaming user profiles on a Remote Desktop Services environment through the user account in Active Directory instead of utilising Group Policy setting "Set roaming profile path for all users logging onto this computer", the Microsoft preferred method as it ensures each profile folder matches the username and prevents inconsistencies which may encore as a result of an administrator incorrectly naming a folder.  It is recommended all Remote Desktop Services environments utilise Group Policy as a means of setting roaming profile and not the Active Directory user accounts.

I am in the process of implementing a new file server into the customers environment and updating the Remote Desktop Services profiles to point to the new file server.  My customer has the remote desktop services profile specified on each user account and there are inconsistencies as to how the profile is named, it does not always match username!  As a result we are not able to simply move to Group Policy roaming profile mapping moving forward.

I need a way of performing a find and replace to update the Remote Desktop Services User Profile path to match the new file server.  I achieved this by writing a PowerShell script to perform this task which I would like to share with you - here is a copy of my code:


$erroractionpreference=“stop"


$pDirValueOld="\\oldserver\rdsprofiles"

$pDirValueNew="\\newserver\rdsprofiles"


$profilepath=$null


$searcher=New-Objectadsisearcher

$searcher.Filter ="(&(objectCategory=person)(objectClass=user))"

$searcher.SearchRoot ="LDAP://OU=Users,OU=Avantgarde Technologies,OU=Companies,OU=Active Directory,DC=at,DC=local"

$searcher.PageSize =1000

$results=$searcher.FindAll()


foreach($resultin$results)

{

$ADuser=[adsi]$result.Path

        foreach($userin$ADuser)

        {

        echo$user.distinguishedName

        $profilepath=$null

        $profilepath=$user.psbase.InvokeGet(“TerminalServicesProfilePath") -replace[regex]::Escape($pDirValueOld),($pDirValueNew)

        $user.psbase.InvokeSet(“TerminalServicesProfilePath",$profilepath)

        $user.setinfo()

        }

}  

To utilise this code you want to modify the following values:

$pDirValueOld = "\\oldfileserver\share"

$pDirValueNew = \\newfileserver\share

$searcher.SearchRoot = "LDAP://OU=Users,OU=Avantgarde Technologies,OU=Companies,OU=Active Directory,DC=at,DC=local
  • pDirValueOld is the value you want to search for to be replaced.
  • pDirValueNew is the value you wish to set the profile to.
  • $searcher.SearchRoot is the LDAP path in Active Directory you wish to run this query recursively against.
Now I have a bunch of users in the Avantgarde Technologies --> Users OU which need to be updated.  As you see I have my Remote Desktop Services profile populated below:

 
I put the code into my PowerShell ISE development environment (as an alternative from saving it as a .ps1 script).  Then I made sure the following fields were populated correctly.
 
 
Run the code and all users recursively will have the Remote Desktop Services profile updated to point to the new path through a find and replace!
 
We can see the profile was successfully updated.
 
 
You can also modify my above code to perform a fine and replace on other items in the user account!

Hope you have found this post helpful!

Unable to Delete Emails on Exchange 2010 Sent from Scanner

$
0
0
A customer of mine running Exchange 2010 SP3 with no Update Rollups had an issue where users were unable to delete emails sent from a scanner.  The issue was experienced in both Microsoft Outlook and Microsoft Outlook Web App.

The following screenshot shows Exchange 2010 Outlook Web App on Internet Explorer 11 where I have selected a bunch of emails all sent from a scanner at my customers office.


After selecting all emails and selecting the delete button, emails simply did not delete as shown in the following screenshot.


Note: The Outlook Web Access is running OWA Light as Exchange 2010 SP3 Update Rollup 3 is required for the full client to work correctly on Internet Explorer 11.

After investigating I discovered this was caused by a bug in Exchange Server which was first introduced in Exchange 2010 SP2 RU6 and was around until Exchange 2010 SP3.  The bug has been documented on the following Microsoft Knowledge Base article and matches the symptoms of my customer:

http://support.microsoft.com/kb/2822208

The resolution for this issue is to simply install the latest Update Rollup on the Exchange 2010 infrastructure.  As of this writing the latest Update Rollup is 6 for Exchange 2010 SP3 which is available from the following website:

http://www.microsoft.com/en-au/download/details.aspx?id=43101

Exchange 2007 Mailbox Import Export Issues with Outlook 2010

$
0
0
A customer of mine experienced two hard disks dying in a RAID5 array over a weekend which held their Exchange 2007 mailbox databases.  They also had no recent backup of the Exchange mailbox databases.

Luckily this customer only has approximately 20 users all who run cached Exchange mode within Outlook 2010.  As a result, their mail was stored locally on each workstation in their OST file.  I went around to each workstation and exported the users mailbox to a PST file.

Next I replaced the disks and rebuild the RAID5 array, created a new NTFS partition and started the Information Store.  This generated new black mailbox databases.

With Exchange 2007, you need to use the legacy Import-Mailbox cmdlet instead of the New-MailboxImportRequest cmdlet available in Exchange 2010 and Exchange 2013.  Import-Mailbox requires a 32bit computer running 32bit version of Outlook.  I downloaded the Exchange 2007 SP3 32bit installation which I installed on a 32bit Windows 7 workstation joined to the domain and installed only the Exchange 2007 Management Tools.

When attempting to import a mailbox it failed with the following error:

[PS] C:\Windows\system32>Import-Mailbox -Identity information -PSTFolderPath C:\pstfiles\info.pst -Verbose

VERBOSE: Import-Mailbox : Beginning processing.
VERBOSE: Import-Mailbox : Trying to open registry key 'Software\\Microsoft\\Windows\\CurrentVersion\\App Paths\\OUTLOOK.EXE'.
VERBOSE: Import-Mailbox : The default value of the registry key is 'C:\PROGRA~1\MICROS~1\Office14\OUTLOOK.EXE'.
VERBOSE: Import-Mailbox : The version of Outlook.exe is '14.0.6131.5000'.
VERBOSE: Import-Mailbox : Searching objects "information" of type "ADUser" under the root "$null".
VERBOSE: Import-Mailbox : Previous operation run on global catalog server 'JCC-SBS.domain.local'.
VERBOSE: Import-Mailbox : Processing object "domain.local/MyBusiness/Users/Exchange/Shared Mailboxes/Information".
VERBOSE: Import-Mailbox : Searching objects "jcc-sbs" of type "Server" under the root "$null".
VERBOSE: Import-Mailbox : Previous operation run on domain controller 'JCC-SBS.domain.local'.
VERBOSE: Import-Mailbox : Searching objects "JCC-SBS\First Storage Group\Mailbox Database" of type "MailboxDatabase" under the root "$null".
VERBOSE: Import-Mailbox : Previous operation run on domain controller 'JCC-SBS.domain.local'.

Confirm
Are you sure you want to perform this action?
Importing mailbox content from .pst file 'C:\pstfiles\info.pst' to mailbox 'Information'. This operation may take a long time to complete.
[Y] Yes  [A] Yes to All  [N] No  [L] No to All  [S] Suspend  [?] Help
(default is "Y"):y

VERBOSE: Import-Mailbox : Ending processing.
VERBOSE: Import-Mailbox : [information] The operation has started.
VERBOSE: Import-Mailbox : [information] Initializing MAPI, loading library.
VERBOSE: Import-Mailbox : [information] Approving object.
VERBOSE: Import-Mailbox : [information] Logging on to the MAPI profile.
VERBOSE: Import-Mailbox : [information] Opening Exchange mailbox.

Import-Mailbox : Error was found for Information (info@domain.com) because: Error occurred in the step: Approving object. An unknown error has occurred., error code: -2147221233
At line:1 char:15
+ Import-Mailbox <<<<  -Identity information -PSTFolderPath C:\pstfiles\info.pst -Verbose
    + CategoryInfo          : InvalidOperation: (0:Int32) [Import-Mailbox], RecipientTaskException
    + FullyQualifiedErrorId : 39DE607E,Microsoft.Exchange.Management.RecipientTasks.ImportMailbox

VERBOSE: Import-Mailbox : [information] The operation has finished.


Most resolutions on the Internet for this problem is to simply run FIXMAPI.exe from a command prompt.  This however did not resolve my issue.  After further research, I found that two updates released by Microsoft for Outlook 2010 cause this problem:
  • KB2597090
  • KB2687623
Simply uninstall these updates from "Programs and Features" in Control Panel.  Make sure you enable "View Installed Updates" so that the updates come up in the list.

After uninstalling these patches, I rebooted the Windows 7 workstation and straight away I was able to import mailboxes and export.


V-79-10000-11226 - VSS Snapshot error Microsoft Exchange 2007

$
0
0
An SBS Customer of mine running Exchange 2007 on Microsoft Windows Server SBS 2008 with Backup Exec 2010 R2 ran into a backup issue where their Exchange 2007 backups with GRT began failing.  The backups had been operational for over 3 years and suddenly started failing with the following errors.

Before I cover of the errors we were experiencing, it is important to note that during this time we also had disk problems with disks in a RAID5 array failing and requiring replacing.  The failing disks also resulted in some slight disk corruption and I needed to repair the Exchange database with eseutil /p.

The following errors were experienced:

- AOFO: Initialization failure on: "\\SERVER\Microsoft Information Store\First Storage Group". Advanced Open File Option used: Microsoft Volume Shadow Copy Service (VSS).
V-79-10000-11226 - VSS Snapshot error. The Microsoft Volume Shadow Copy Service (VSS) snapshot provider selected returned: "Unexpected provider error". Ensure that all provider services are enabled and can be started. Check the Windows Event Viewer for details.


In addition to the above Backup Exec error, the following Windows Application Event Logs were logged:

Log Name:      Application
Source:        VSS
Date:          9/18/2014 7:45:11 PM
Event ID:      12293
Task Category: None
Level:         Error
Keywords:      Classic
User:          N/A
Computer:      Server.domain.local
Description:
Volume Shadow Copy Service error: Error calling a routine on a Shadow Copy Provider {b5946137-7b9f-4925-af80-51abd60b20d5}. Routine details EndPrepareSnapshots({2c88e07d-a06c-4f6f-b826-b6e8bbfd3e10}) [hr = 0x8000ffff].
Operation:
   Executing Asynchronous Operation
Context:
   Current State: DoSnapshotSet


After researching VSS EventID 12293 it brought me to http://support.microsoft.com/kb/924262 which said the resolution was:

"To resolve this issue, you can delete a Snapshot copy that lets you continue with your present backup."

I went and deleted all Exchange VSS backups with diskshadow.exe by using the following commands:

unexposed e:

delete shadows all

Note: E:\ is the volume containing my Microsoft Exchange databases.


After cleaning up the existing shadow copies, Exchange backups resumed to normal.  I believe the problem was introduced due to the disk corruption problems we experienced.

Outlook 2010 and Exchange 2013 Users Prompted for Authentication

$
0
0
Over the past months I have had customers complain about Outlook 2010 users getting prompted for username/password when moving to Exchange 2013.  In previous versions of Exchange server such as 2003, 2007 and 2010, users connected to the Exchange server using RPC or Outlook Anywhere.  Exchange connectivity for clients has changed significantly in Exchange 2013 and now only Outlook Anywhere is supported, with the Exception of MAPI over HTTP for Exchange 2013 SP1 only when using Outlook 2013 SP1 clients.

The following table summaries the connection methods available for the various versions of Outlook and Exchange Server.


The default method of Outlook connecting to the Exchange server has always been to use RPC for
internal connections and Outlook Anywhere for external connections.  As Outlook Anywhere was originally only designed to be used for external connections, the Autodiscover service in Exchange 2007 and 2010 only provided Outlook clients with one set of configuration parameters used for external connectivity.

The screenshot below displays the configuration output from Outlook Anywhere on a Exchange 2010 client access server.  Notice there is only one External Hostname for connectivity and one Client Authentication Method you can specify.


In Exchange 2013 we now have the ability to specify different hostnames and authentication methods based on if the client is internal or external.


The authentication type is very important:
  • NTLM Authentication will leverage the credentials you used when signing into Windows and result in the Outlook client automatically signing in without prompting for authentication.
  • Basic Authentication is clear text authentication which does not use your Windows credentials.  As long as the Basic Authentication is encapsulated within Secure Socket Layer will it be secure.
As a general rule of thumb you want to use Basic Authentication for external connections and NTLM Authentication for internal connections.  You can use NTLM externally as well however I have had issues with it passing through some firewalls and proxy servers on remote networks so I advise my customers to always use Basic Authentication for maximum supportability for remote connections.

Here is where things get a little tricky.  Outlook 2010 RTM only understands the External Autodiscover response for Outlook Anywhere, not the Internal response.  This is shown in the screenshot below, notice the Server address is my ExternalURL and the Authentication is Basic.

This means provided you have split DNS in place for the External FQDN used for connectivity "mail.company.com", your clients will connect but with Basic Authentication.  This will result in the Outlook clients being prompted for authentication.


As of Outlook 2010 SP1 and higher it supports the Internal and External Autodiscover response for Outlook Anywhere which I have displayed below in two screenshots as I needed to scroll down in the Test E-mail AutoConfiguration screen:

Note: I went straight to Outlook 2010 SP2 in the screenshot below.


To ensure Outlook clients are not prompted for Authentication, ensure they are set to use NTLM authentication.  If Outlook 2010 clients have not been service packed, they will always receive the External authentication method.

In summary make sure you have done the following:
  • Configured your External and Internal Authentication types correctly using the information provided above.
  • Upgraded your Outlook clients to the latest service pack
 I hope this post has been helpful.

Exchange Database file: '-546 The log file sector size does not match the sector size of the current volumn

$
0
0
When attempting to backup an Exchange 2007 server running on Small Business Server 2008 with Backup Exec 2010 R2, the Exchange backup component of the selection failed with the following error in the job log.

Backup- \\SERVER\Microsoft Information Store\First Storage GroupV-79-57344-918 - Unable to complete the operation for the selected resource using the specified options.  The following error was returned when opening the Exchange Database file:  '-546 The log file sector size does not match the sector size of the current volumn. '
Backup- \\SERVER\Microsoft Information Store\Second Storage GroupV-79-57344-918 - Unable to complete the operation for the selected resource using the specified options.  The following error was returned when opening the Exchange Database file:  '-546 The log file sector size does not match the sector size of the current volumn. '


 This error occurred when backing up to a HP Tape Library attached to the server via SCSI.  When I attempted to do a disk based backup with Backup Exec 2010 R2 as a test, it worked successfully.

After leasing with Symantec, it turned out when backing up to tape, Backup Exec requires a temporary staging directory to be use during the backup job.  By default, Backup Exec selects the largest volume with the most available free space.  This cannot be a Removable USB Drive!

Backing up to disk does not require this staging area.

I had a 4TB USB Drive attached to the SBS 2008 server which was causing this issue.  To resolve the issue you need to manually specify what drive to use for staging by following these steps:

1. On the Exchange Server, click Start -> Run and type "regedit".  Click OK.
2. Within the Registry Editor, navigate to HKLM\SOFTWARE\Symantec\Backup Exec For Windows\Backup Exec\Engine\Exchange
3. Right click and add a new String Value, "OnHostTemp".
4. Right click and set the value of OnHostTemp to "C:\Temp"
5. Restart the Backup Exec Remote Agent for Windows Systems service on the Exchange Servers.
6. Run tape backup job of Exchange Resources from media server.

I selected H:\Temp as it had the most available free space on my SBS 2008 server.


After putting this RegKey in place it resolved the issue.

Direct Access - IPHTTPS interface creation failed 0x643

$
0
0
Today I had an issue with a Windows 7 Enterprise laptop on my domain failing to successfully create a Direct Access connection to my Windows Server 2012 R2 server.  The error raised on the HTTPSTunnel interface was 0x643 with a status of IPHTTPS interface creation failure.


Also in Device Manager, the httpstunnel interface had a yellow explanation mark.

This problem can be caused by a few things, one of the most common causes is the DisabledComponents DWORD not being set to 0 which in effect disables IPv6 which is required by Direct Access.  Check this under the following registry key:

HKLM\SYSTEM\CurrentControlSet\services\TCPIP6\Parameters

Note: If this registry key does not exist, it is the same as having it being set to 0.


Another issue which can cause this error is when the computer looses its trust with the computer account object in Active Directory.  When you bring the computer in and plug it into the internal network, you will see one of these two errors:

The trust relationship between this workstation and the primary domain failed.

 
The security database on the server does not have a computer account for this workstation trust relationship.
 
 
Simply re-join the computer to the Active Directory domain and this will resolve the Direct Access error IPHTTPS interface creation failed 0x643.

What is the SCCM Management Point?

$
0
0
A management point is a site system role that provides policy and service location information for clients and it also receives configuration data from clients. When we deploy software to a client, the client sends a content request to a management point.  The management point sends a list of the preferred distribution points to the client, and the client uses one of the preferred distribution points as source location for content. If contents are not available on the preferred distribution point, the management point sends a list to the client with distribution points that have the content available.

Management Point can be defined on client computers when they are installed, or client can get the list of Management points through DNS or WINS.

Clients search for a Management Point by using the below options in the order specified:
  • Management point
  • Active Directory  Domain Services
  • DNS
  • WINS
 

Couldn't resolve the user or group "domain.local/Microsoft Exchange Security Groups/Discovery Management." If the user or group is a foreign forest principal, you must have either a two-way trust or an outgoing trust.

$
0
0
I ran into a problem when running the Exchange 2010 SP1 setup in an environment with a single Exchange 2007 SP3 server.  The setup failed on the Mailbox Server role with the following error:

Error:
The following error was generated when "$error.Clear();
          $name = [Microsoft.Exchange.Management.RecipientTasks.EnableMailbox]::DiscoveryMailboxUniqueName;
          $dispname = [Microsoft.Exchange.Management.RecipientTasks.EnableMailbox]::DiscoveryMailboxDisplayName;
          $dismbx = get-mailbox -Filter {name -eq $name} -IgnoreDefaultScope -resultSize 1;
          if( $dismbx -ne $null)
          {
            $srvname = $dismbx.ServerName;
            if( $dismbx.Database -ne $null -and $RoleFqdnOrName -like "$srvname.*" )
            {
              Write-ExchangeSetupLog -info "Setup DiscoverySearchMailbox Permission.";
              $mountedMdb = get-mailboxdatabase $dismbx.Database -status | where { $_.Mounted -eq $true };
              if( $mountedMdb -eq $null )
              {
                Write-ExchangeSetupLog -info "Mounting database before stamp DiscoverySearchMailbox Permission...";
                mount-database $dismbx.Database;
              }

              $mountedMdb = get-mailboxdatabase $dismbx.Database -status | where { $_.Mounted -eq $true };
              if( $mountedMdb -ne $null )
              {
                $dmRoleGroupGuid = [Microsoft.Exchange.Data.Directory.Management.RoleGroup]::DiscoveryManagementWkGuid;
                $dmRoleGroup = Get-RoleGroup -Identity $dmRoleGroupGuid -DomainController $RoleDomainController -ErrorAction:SilentlyContinue;
                if( $dmRoleGroup -ne $null )
                {
                  Add-MailboxPermission $dismbx -User $dmRoleGroup.Identity -AccessRights FullAccess -DomainController $RoleDomainController -WarningAction SilentlyContinue;
                }
              }
            }
          }
        " was run: "Couldn't resolve the user or group "domain.local/Microsoft Exchange Security Groups/Discovery Management." If the user or group is a foreign forest principal, you must have either a two-way trust or an outgoing trust.".

Couldn't resolve the user or group "domain.local/Microsoft Exchange Security Groups/Discovery Management." If the user or group is a foreign forest principal, you must have either a two-way trust or an outgoing trust.
The trust relationship between the primary domain and the trusted domain failed.


The mailbox role is the last role which is installed as part of the Exchange 2010 SP1 setup process.  Despite this error occurring, the Exchange 2010 SP1 installation did complete with all Exchange 2010 services present on the server, started and in a functional state.  The Exchange 2010 SP1 management tools were also installed and working.

As a result I pushed on and began installing the Exchange 2010 SP3 upgrade installation package.  The Exchange 2010 SP3 upgrade installation package also did not complete the installation correctly and failed with the same error:

Error:
The following error was generated when "$error.Clear();
          $name = [Microsoft.Exchange.Management.RecipientTasks.EnableMailbox]::DiscoveryMailboxUniqueName;
          $dispname = [Microsoft.Exchange.Management.RecipientTasks.EnableMailbox]::DiscoveryMailboxDisplayName;
          $dismbx = get-mailbox -Filter {name -eq $name} -IgnoreDefaultScope -resultSize 1;
          if( $dismbx -ne $null)
          {
            $srvname = $dismbx.ServerName;
            if( $dismbx.Database -ne $null -and $RoleFqdnOrName -like "$srvname.*" )
            {
              Write-ExchangeSetupLog -info "Setup DiscoverySearchMailbox Permission.";
              $mountedMdb = get-mailboxdatabase $dismbx.Database -status | where { $_.Mounted -eq $true };
              if( $mountedMdb -eq $null )
              {
                Write-ExchangeSetupLog -info "Mounting database before stamp DiscoverySearchMailbox Permission...";
                mount-database $dismbx.Database;
              }

              $mountedMdb = get-mailboxdatabase $dismbx.Database -status | where { $_.Mounted -eq $true };
              if( $mountedMdb -ne $null )
              {
                $dmRoleGroupGuid = [Microsoft.Exchange.Data.Directory.Management.RoleGroup]::DiscoveryManagementWkGuid;
                $dmRoleGroup = Get-RoleGroup -Identity $dmRoleGroupGuid -DomainController $RoleDomainController -ErrorAction:SilentlyContinue;
                if( $dmRoleGroup -ne $null )
                {
                  Add-MailboxPermission $dismbx -User $dmRoleGroup.Identity -AccessRights FullAccess -DomainController $RoleDomainController -WarningAction SilentlyContinue;
                }
              }
            }
          }
        " was run: "Couldn't resolve the user or group "domain.local/Microsoft Exchange Security Groups/Discovery Management." If the user or group is a foreign forest principal, you must have either a two-way trust or an outgoing trust.".

Couldn't resolve the user or group "domain.local/Microsoft Exchange Security Groups/Discovery Management." If the user or group is a foreign forest principal, you must have either a two-way trust or an outgoing trust.
The trust relationship between the primary domain and the trusted domain failed.


In the Exchange 2010 with SP1 installation package, the Management Tools were installed before the Hub Transport, Client Access and Mailbox Server roles.  When running Exchange 2010 SP3 upgrade package, the Management Tools are installed after the Hub Transport, Client Access and Mailbox Server roles and as a result were not upgraded as part of the Service Pack.  When the Service Pack failed on the Mailbox role it skipped updating the Management Tools - as a result this problem needed to be addressed.

The error is stating it could not resolve user or groups for Discovery Management - there is only one discovery user created by default with Exchange 2010 called:

DiscoverySearchMailbox {D919BA05-46A6-415f-80AD-7E09334BB852}

As a result I decided to recreate this mailbox by deleting it and recreating it.  This was done with the following commands:

Disable-Mailbox "DiscoverySearchMailbox {D919BA05-46A6-415f-80AD-7E09334BB852}"

Enable-Mailbox "DiscoverySearchMailbox {D919BA05-46A6-415f-80AD-7E09334BB852}" -Arbitration


Next I assigned the Discovery Management user permissions to the new mailbox with the following command:

Add-MailboxPermission -Identity:"cosp.internal/Users/DiscoverySearchMailbox {D919BA05-46A6-415f-80AD-7E09334BB852}" -User:"Discovery Management" -AccessRights:"FullAccess"


After this I deleted the Exchange 2010 SP3 installation watermark (both the “Action” and “Watermark” entries in the registry) and re-ran setup.  Google for this, lots of information already available on the Internet.

After making these changes I was able to successfully patch the Exchange 2010 SP1 server with Exchange 2010 SP3.


This server role can't be installed because the following roles aren't current: AdminToolsRole

$
0
0
When attempting to install Exchange 2010 SP3 service pack on an Exchange 2010 SP1 server I received the following error:

This server role can't be installed because the following roles aren't current: AdminToolsRole

 
This error occurs if the original Exchange 2010 SP1 or SP2 installation did not finish "Finalizing Setup" which is the final stage in the installation process.  Failure means important registry keys are not set correctly.  In my case the Finalizing Setup did not complete because of the following error:
 
 
The above error is triggered if the ConfiguredVersion does not match the UnpackedVersion registry key.  These registry keys can be found under the following location:
 
HKLM\SOFTWARE\Microsoft\ExchangeServer\v14\AdminTools
 
To fix this I made sure the ConfiguredVersion key matches the UnpackedVersion key as shown in the following screenshots:
 
Before:
 
 
After:
 
 
After this I deleted the Exchange 2010 SP3 installation watermark (both the “Action” and “Watermark” entries in the registry) and re-ran setup.  Google for this, lots of information already available on the Internet.
 
Note: If you experienced this error you may also experience the following:
 
Viewing all 343 articles
Browse latest View live